AAL installation
#1
 08-06-2009


Join Date: Nov 2008
Location: CT
Posts: 808
Likes: 0
Received 0 Likes
on
0 Posts
AAL installation
So I got my 2" short AAL and 2" extended rear procomp es3000 shocks today, the front shocks still have not come they were on backorder.
But, I can not find a write up anywhere on how to install the AAL, it looks like its going to be a pita and i have no idea where to start. Anyone know where there's a write up?
And how long should I expect it to take?
It can be more difficult than installing my bl, right?
But, I can not find a write up anywhere on how to install the AAL, it looks like its going to be a pita and i have no idea where to start. Anyone know where there's a write up?
And how long should I expect it to take?
It can be more difficult than installing my bl, right?
#2
08-06-2009
#5
08-07-2009

Yup...not much too it really. Take two C-clamps to the leaf on either side of the center bolt. Bolt bolt the stock center bolt(use a pair of vice grips on the rounded 'bolt head' on the factory bolts). Slowly let off pressure evenly on the c-clamps. Now your leaf pack will be free of the center bolt. Get your AAL...place it ABOVE the thick flat spring thats called the "overload spring", get your new bolt/all thread and start threaded it together...tighten it as much as you can by hand....then put your c-clamps on. Tighten both sides evenly and you may want to put something on the c-clamp handle to get more leverage on it(breaker bar). You really don't want to put all the strain on the centerbolt...let the c-clamps do that. Get the center bolt all nice and tight, cut off excess threads, bolt axle back to it, done.
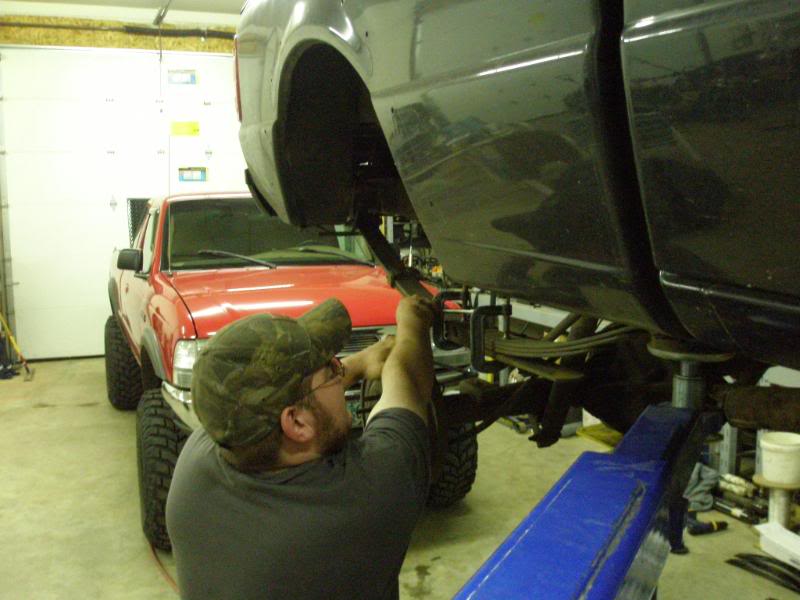
Here's a pic of mine in progress of installation...
BTW...I only got 1.5" out of my Pro Comp Short AAL's.
Here's a pic of mine in progress of installation...
BTW...I only got 1.5" out of my Pro Comp Short AAL's.
#6
08-07-2009
Join Date: Apr 2007
Location: petersburg
Posts: 630
Likes: 0
Received 0 Likes
on
0 Posts
#8
08-07-2009
Join Date: Apr 2007
Location: petersburg
Posts: 630
Likes: 0
Received 0 Likes
on
0 Posts
 suurree suurree
#12
08-09-2009
hmmm...
Above the super thick spring, yet below all the other springs. Pretty much from the top, longest to shortest. You can see my AAL in this pic....

For mine, I didn't need to. Stock you've got like 1.5" of play room in the threads of the u-bolts. Although I will say people do suggest getting new ones anyway because U-bolts stretch when they are tightened.
For mine, I didn't need to. Stock you've got like 1.5" of play room in the threads of the u-bolts. Although I will say people do suggest getting new ones anyway because U-bolts stretch when they are tightened.
#13
08-09-2009
Join Date: Oct 2007
Location: Hull, Quebec
Posts: 486
Likes: 0
Received 0 Likes
on
0 Posts
I installed my procomp AAL yesterday.
Existing ubolts are fine, long enough.
I didn't even have to seperate the spring pack. I used c-clamps on each end of the existing leafs, tightened down like a B. Jacked up truck after taking off ubolts, seperated it from axle (thank you Mr. Crow-bar), cut off the center pin with my grinder, installed new AAL, and then spent the rest of the day swearing at my shackle bolts. Used all hand tools except for the grinder.
Only hard part was aligning the leafs with axle when putting it back together. A BFH helped by whacking the end of the overload leaf to knock the center pin back into its "hole".
#14
08-09-2009
Join Date: Nov 2008
Location: CT
Posts: 808
Likes: 0
Received 0 Likes
on
0 Posts

#15
08-09-2009
Join Date: Apr 2007
Location: petersburg
Posts: 630
Likes: 0
Received 0 Likes
on
0 Posts
#16
08-09-2009
If you can't figure this one out you may need to have some help or have somebody else put them in for you. It's pretty simple really, just slipping in a leaf between your overload and the rest...
#17
08-10-2009

Join Date: Jul 2009
Location: San Diego, CA
Posts: 165
Likes: 0
Received 0 Likes
on
0 Posts
AAL
1) Raise the rear of the vehicle, support the frame with jack stands, and remove the rear
wheels.
2) With a floor jack, raise the rear axle enough to relieve tension on the shock absorber and remove
them. Disconnect the axle vent hose from the axle housing.
3) Making sure the axle is well supported, remove the axle U-bolt and hardware. Now remove
the spring eye bolts and/or shackles, and remove the springs from the vehicle.
4) Using C-clamps or a large bench vise, hold the spring assembly securely together.
5) If applicable, remove any spring leaf alignment clamps. Using vise-grips to hold the head of
the center bolt, loosen and remove it. If the bolt has rusted, a hammer and drift punch may be used
to drive it out.
6) Carefully remove C-clamps or open vise and lay unassembled spring aside.
7) with a small amount of grease applied to both ends of the Add-A-Leaf, re-assemble leaf
springs with Add-A-Leaf in place.
8) Loosely assemble the completed spring assemblies into their respective axle mounts. replace
the U-bolts, nuts, and washers and torque to factory specifications. Now re-install spring eye
bolts and/or shackles and torque to factory specifications.
9) Re-connect axle vent hose and install shock absorbers.
10) Lower vehicle and test drive.
#19
08-13-2009
Join Date: Jul 2009
Location: San Diego, CA
Posts: 165
Likes: 0
Received 0 Likes
on
0 Posts
u-bolt
The 1/2" u-bolts should be torqued down to 100lbs. and if they are new u-bolts they will stretch so after a test drive they should be re-torqued.
#23
08-13-2009
Join Date: Oct 2007
Location: Hull, Quebec
Posts: 486
Likes: 0
Received 0 Likes
on
0 Posts
I did mine 4 days ago.
Ford manual says 76 ft-lbs. Do it like your wheel lug nuts and your good.
Recheck after 50 miles. A few of mine needed a bit more tightening.
There should be no space between the leaves, except for maybe a bit if you have that plastic thing between them, that will keep them a mm apart.
This is my truck, pic took a few days ago, I have some plastic things between some leaves, you can see them in the pic:

Thread
Thread Starter
Forum
Replies
Last Post


