
How To: Explorer Rear Disc Brake Conversion

Thread Starter
|
RF Veteran

Joined: Jun 2004
Posts: 5,600
Likes: 0
From: Palm Bay, FL
How To: Explorer Rear Disc Brake Conversion
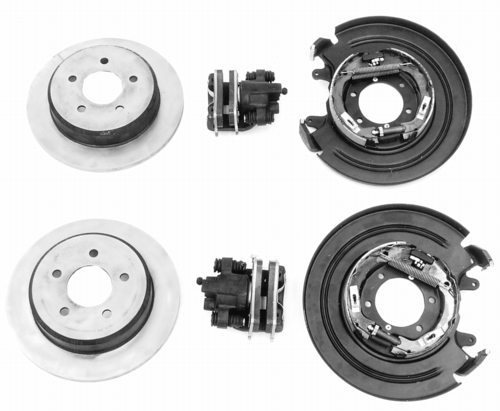
Explorer Rear Disc Brake Conversion From FRPP
This installation was done on the 31 spline axle of a Level II and that this kit will only fit that axle. In other words, the major components will only bolt on to the axle in a 2002 FX4 or a 2003-on Level II. As you know, adapting it to the much more common 28-spline axle would require significant modification of the caliper mounting castings and/or the axle flanges.
Tools/Equipment needed:
* Basic hand tools and a good mechanics wrench set.
First of all we will lay out the parts list.
Ford Racing Parts Rear Disc Brake kit � M-2300-G $300.00-$375.00
Parking brake cables from local parts store or junkyard from 96-01 Explorer - $75.00
Two passenger side brake hoses from local parts store or junkyard from 96-01 Explorer - $40.00
Banjo bolts for rear calipers � Ford Part Number -385116-s2 - $5.00-$7.00
Spider block bolt (If reusing the old one apply thread locker) - $4.00
75w-140 Gear Lube (I used Mobil 1 SynPower Full Synthetic as this was what they had at the parts store) - $15.99 a quart, mine took four quarts.
http://www.fordracingparts.com/parts...tKeyField=1790
This is the kit from ford racing the link to it is above.
Direct Quote from the website:
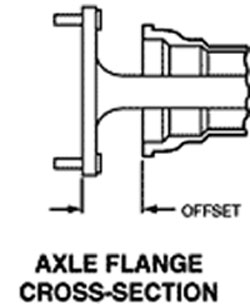
This rear disc brake kit may be low buck, but it really works! Kit includes 11" rotors, calipers, mounting brackets and attaching hardware. The rotors have the popular 5-hole, 4.5" diameter passenger car bolt pattern. Caliper mounting brackets fit the popular 8.8" Truck/9" Late Ford axle housings with 2" x 3.56" pattern and big 3.15" diameter bearing. This kit is designed for vehicle installations with a 2.5" brake gap (housing flange-to-axle shaft flange).
The reason I highlight this is due to my ignorance when I measured the brake gap. This caused me some really unneeded stress and aggravation. You have to measure from the axle housing flange to the outside of the axle. It should be 2.5 inches. The other part is this will only bolt up to a 31 spline big bearing axle.
I used the parking brake cables and rear brake hoses from a 99 Ford Explorer 4wd and am currently investigating other options for the passenger parking brake cable as it is not long enough.
This kit has also been made to work on the 28 spline 8.8 axles by welding up the mounting plate and backing plate holes, redrilling the holes and then mounting. Not sure if I would go this direction but will include the link for your viewing.
http://www.therangerstation.com/Maga...isc_brakes.htm
Now to the good parts.
1. Chock the front tires in the front and rear to reduce the chance of the vehicle rolling.
2. Jack the rear axle up and support with jack stands.
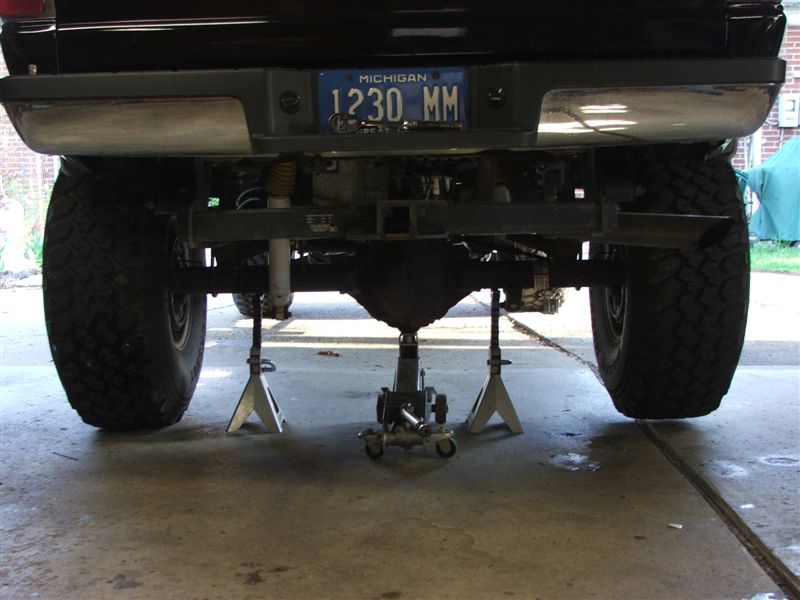
3. Remove the tires and place off to the side for later reinstallation.
4. Remove the brake drums (They make take some kind taps from a hammer to be removed)
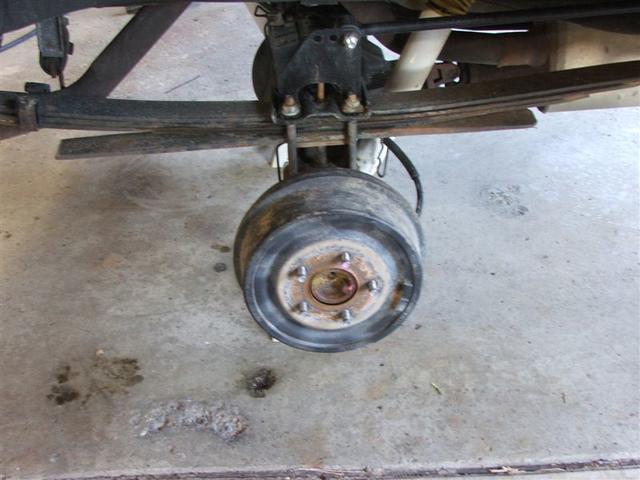
5. Remove the brake shoes and hardware from the backing plates.
Pull some slack down in the emergency brake cable and clamp the line up front at the frame. If you have done a body lift then you should know how to do this already. With the line clamped you should have slack in the line like this.

Separate the intermediate cable from the rear cable so the rear lines can be removed from the truck. This is where the two lines meet and connect the cable that goes to the front of the truck. There are a few retainers on top of the axle that have to be released to remove the cable. I have found that a pair of needle noise pliers works best to release the retainers from the lines.
Place a drain pan under the rear axle and remove the lower bolts working your way up to the top bolts. Reason for this it will allow the bottom of the cover to come out slowly and reduce the chance of a mess.
Remove the bolt/pin from the rear axle that holds the spider block. Be careful with this bolt as it pretty tight and can snap easily. I purchased a new one for a few dollars at the Ford Dealer.
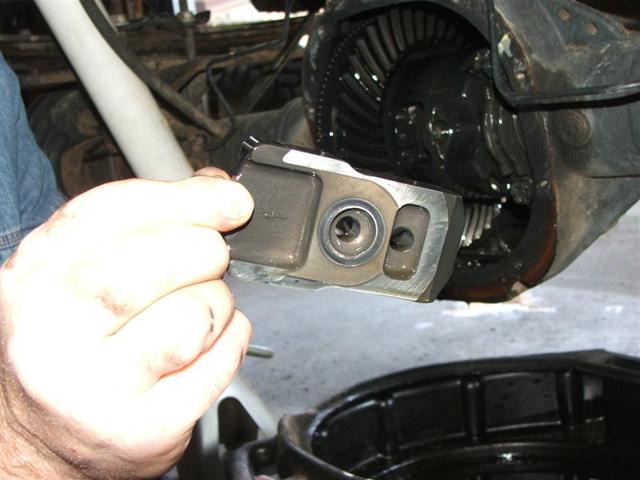
Remove Spider block, Make sure to reinstall in the original orientation.
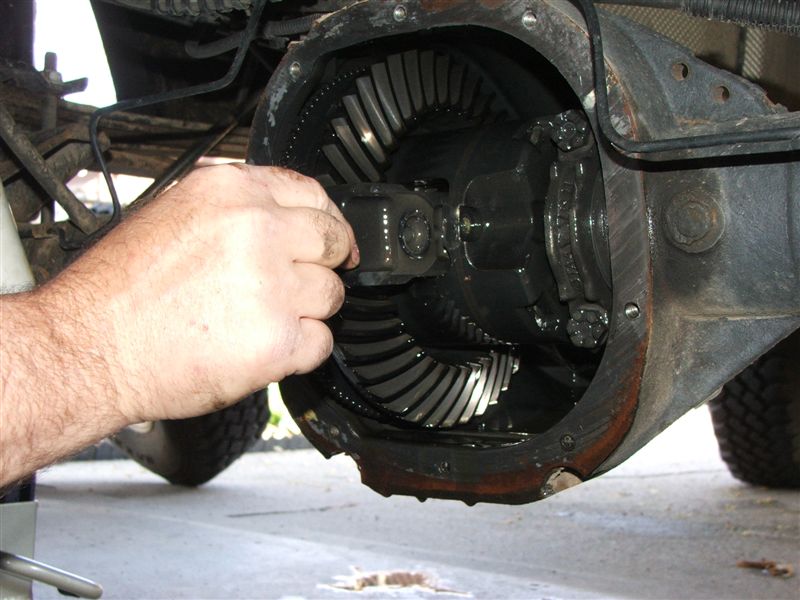
Push the axles in and remove the �C� clips in the center of the differential. You have to repeat this for each axle.
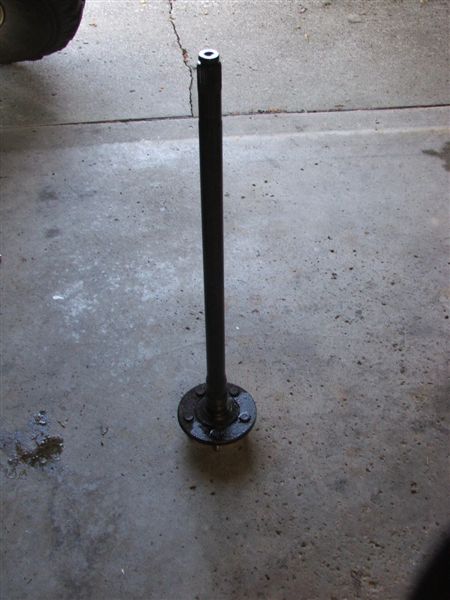
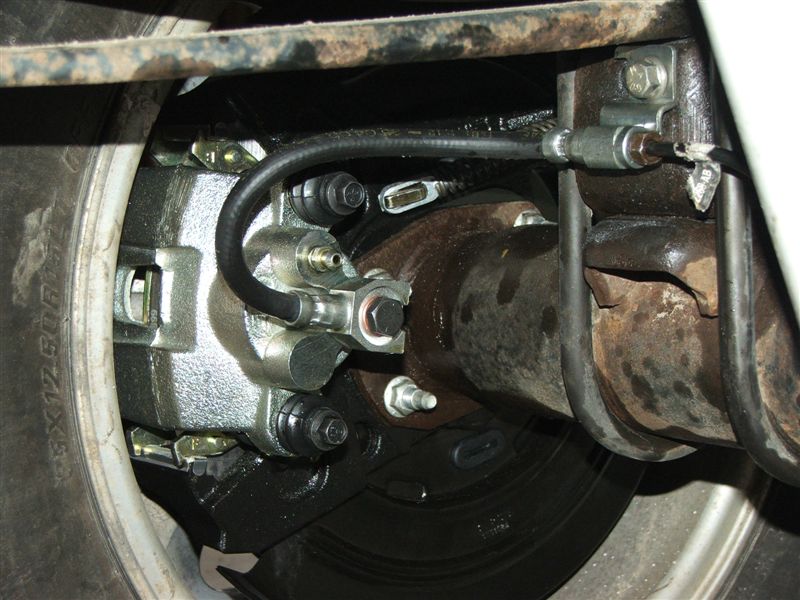
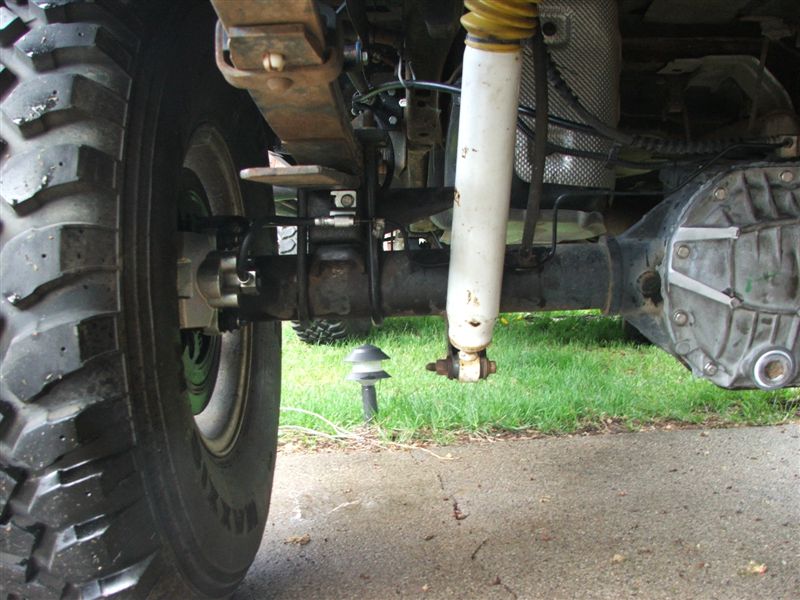
Remove the axles from the axle housing, try not to drag the axle across the seals during removal to prevent damage. Place a rag or drain bucket under the axle housing as there will some fluid from the housing flange. With the axle removed it should look like this, also a picture of one of the axles upright.

Remove the brake lines from the wheel cylinders on each side. You can leave the wheel cylinders attached to the backing plates as I did.
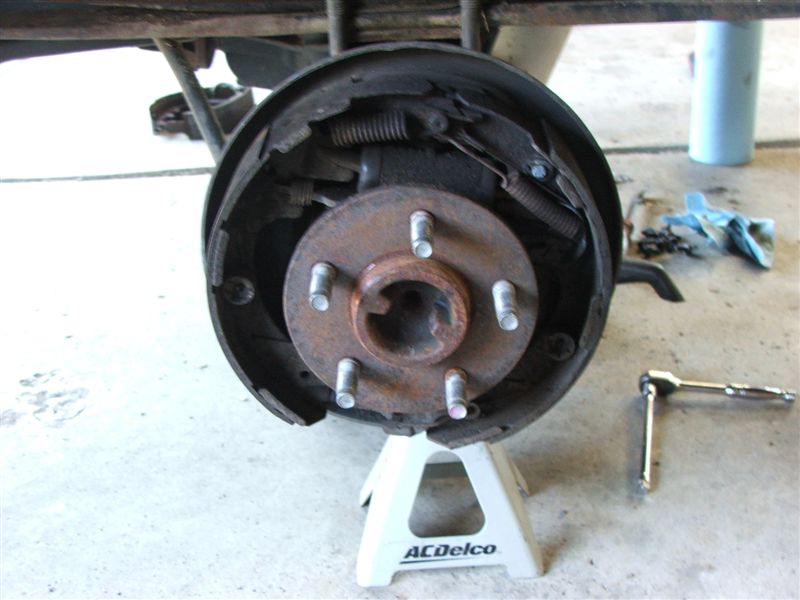
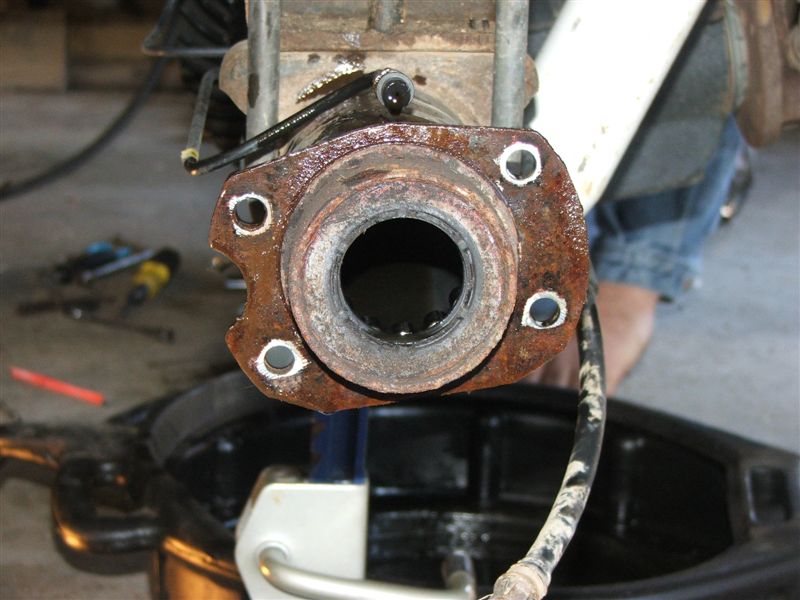
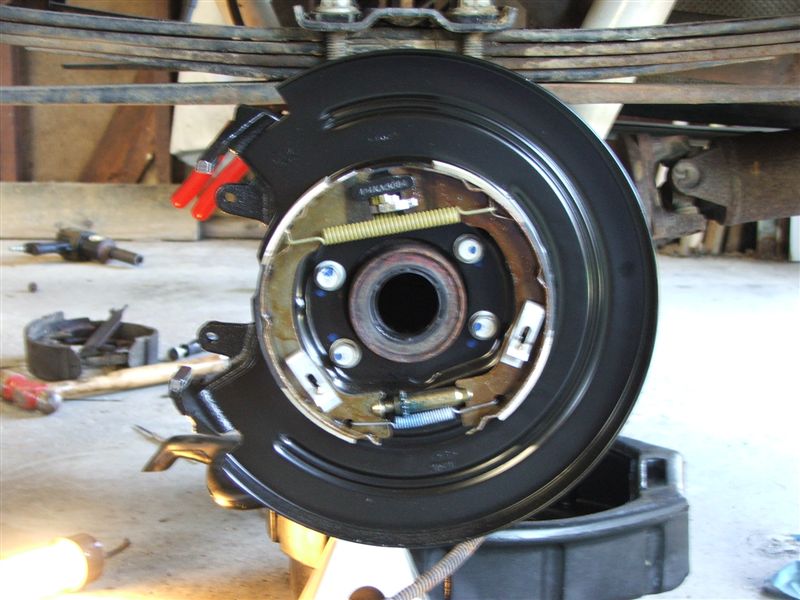
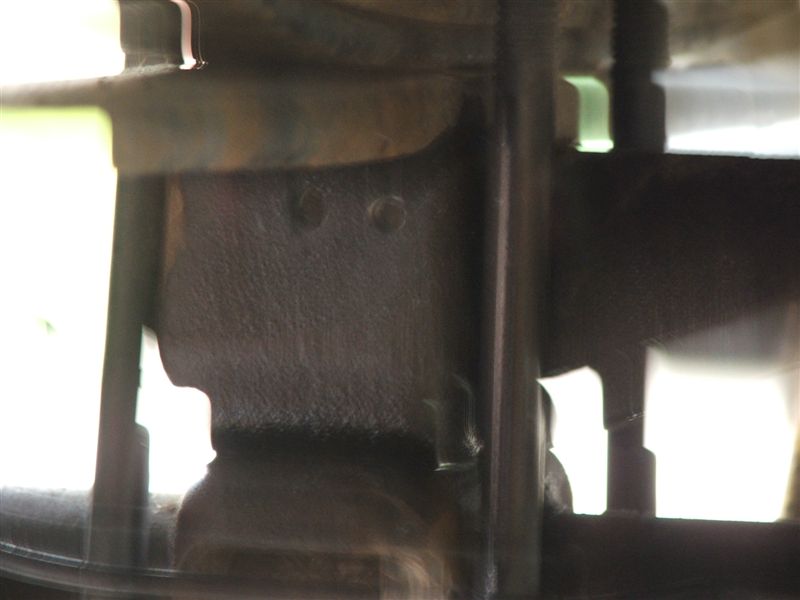
Remove the backing plate from the axle, there are four nuts and bolts that have to be removed and should just pull off once those are removed. With the backing plate removed this is what you end up with.
Clean up the axle housing surface and install the new disc brake backing plate/parking brake assembly. Reassembly was with nuts and bolts as well, torque nuts and bolts to 40-50 lbs. ft.
Here is where it sucks. You have to remove the parking brake shoes, springs and retainers in order to install the axle. Reason being is the axle will not slide in enough to reinstall the �C� clips. There is a spring on the bottom by the adjuster, a spring at the top in front of the shoes and a spring in the back behind the shoes.
Once parking brake shoes and hardware is removed reinstall the axle for the side you are working on, once you install the �C� clip then pull back on the axle to seat the �C� clip.
Here is a picture of the parking brake hardware that has to be removed. Installation of all these springs is pretty fun after the axle is installed. Just take your time and think it through. Repeat this process for the opposite side.

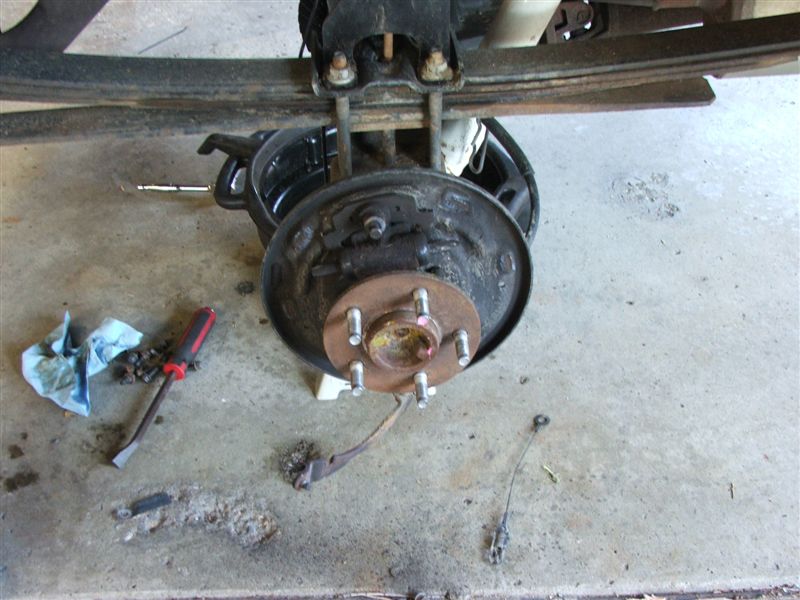
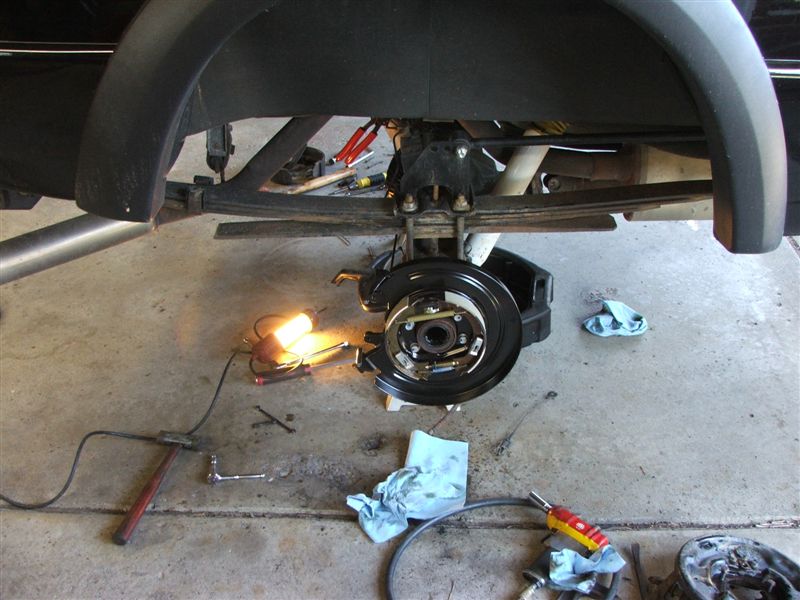
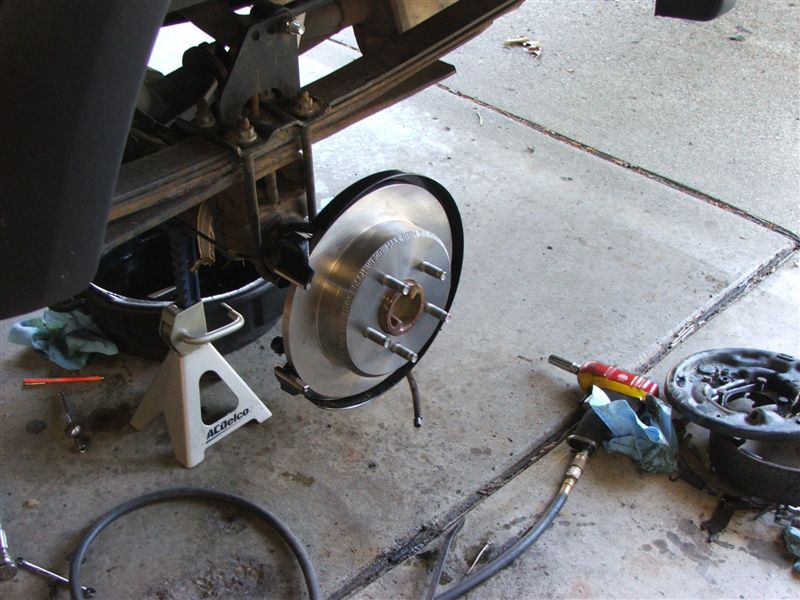
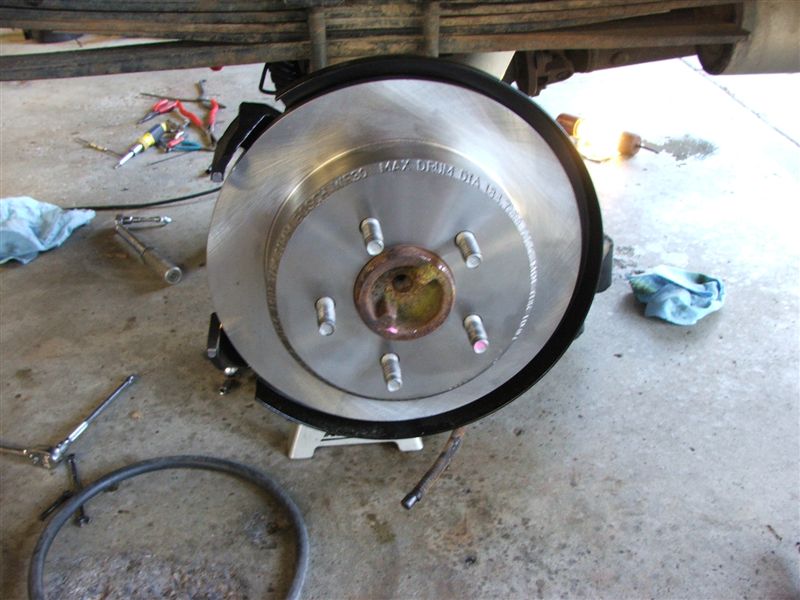
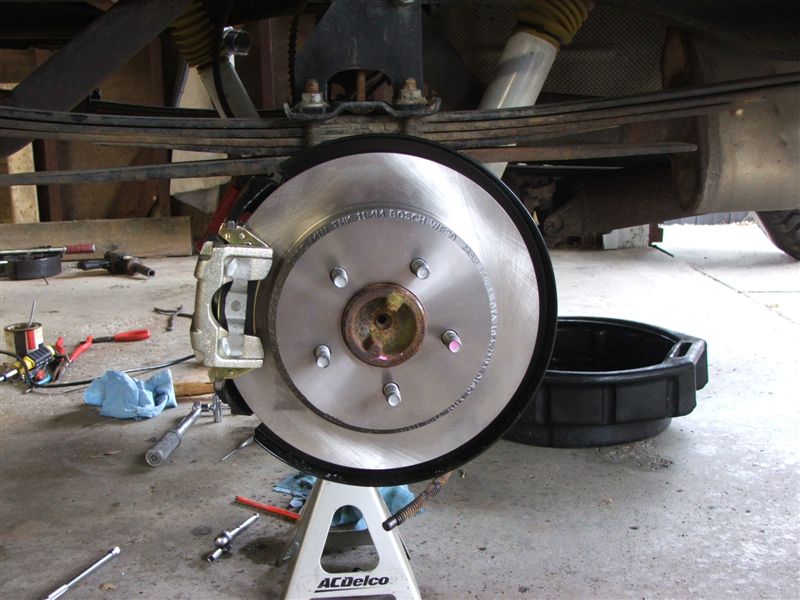
Once the axle and parking brake assembly was reinstalled I installed the rotors and calipers to check clearance. It is not necessary to do this but better be safe then sorry.
Once both axles are reinstalled go ahead and do yourself a favor, reinstall the spider block and bolt. If you did not purchase a new bolt coat the original with thread lock. It is not something that you want backing out. The bolt should be torqued to 22 lbs. ft.
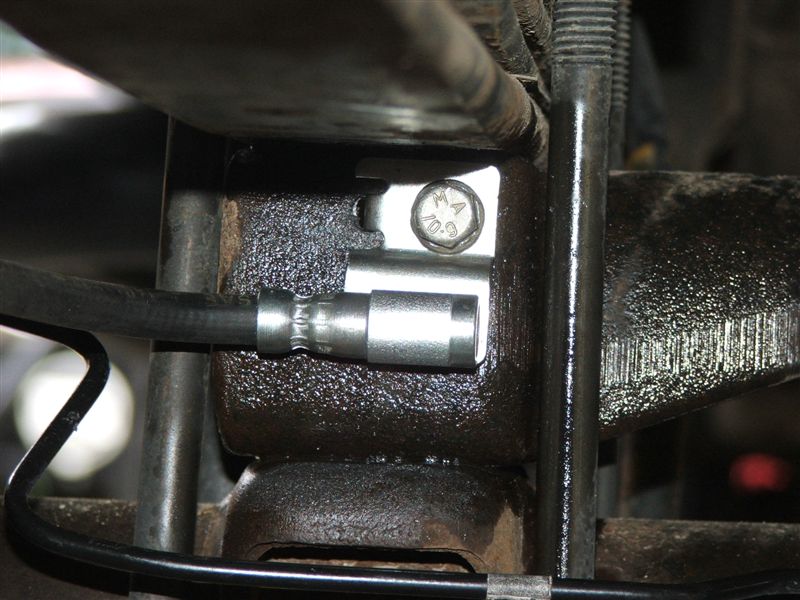
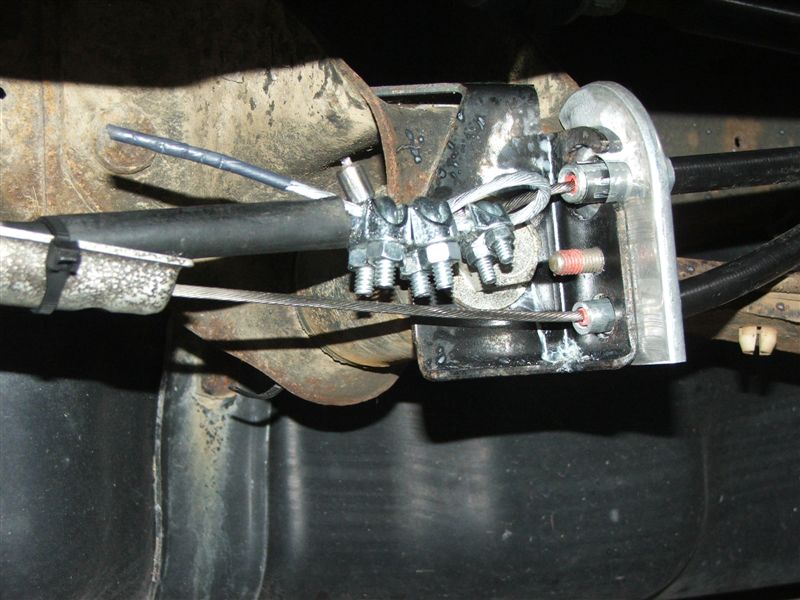
Mount the calipers and rotors for fitting of the brake lines. I used 99 explorer passenger side flex hoses and the original metal brake lines. Torque the banjo bolts to 25 lbs. ft. (bolt that attaches the brake hose to the caliper, make sure you install the brass crush washers. They are one time use.) Route the hoses to the lift block and center punch the holes. Drill two holes and tap the one hole where the bolt will be installed. The other hole is for the bracket locator tab.
Left side
Right side
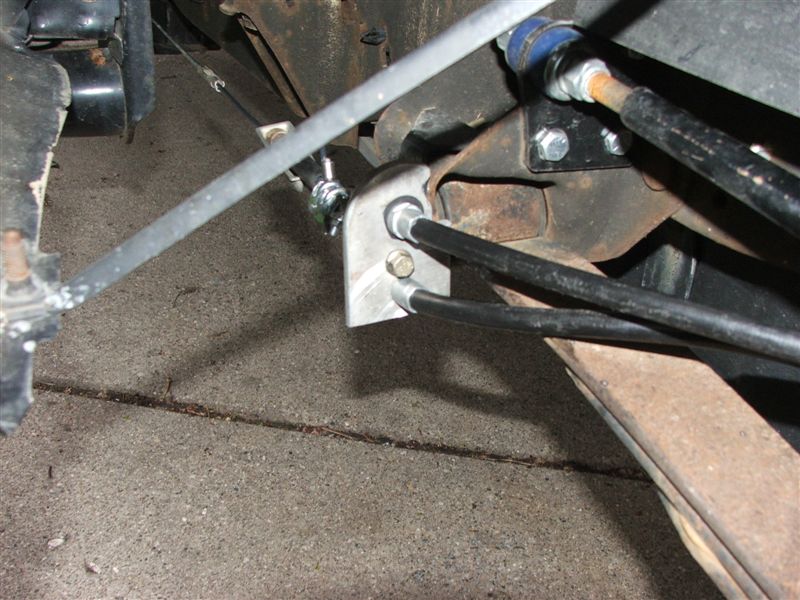
Once the hoses are mounted you can then cut the brake line on the truck to adapt to the new brake hoses. Luckily in our arsenal of tools we had a double flaring kit to flair the lines once cut. The brake lines on my truck are 3/16 and should be pretty standard on the rangers. Remember to leave yourself some room for error when cutting the lines. If you don�t then it may be off to the parts store for some new line.
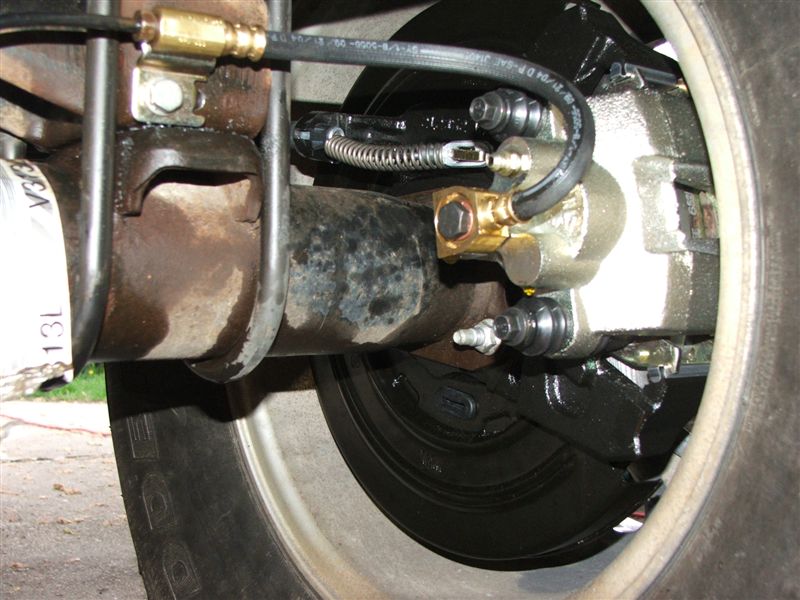
Here is the finished product of the new hoses and reflaired brake lines. Ever thing is mounted and torqued at this time.

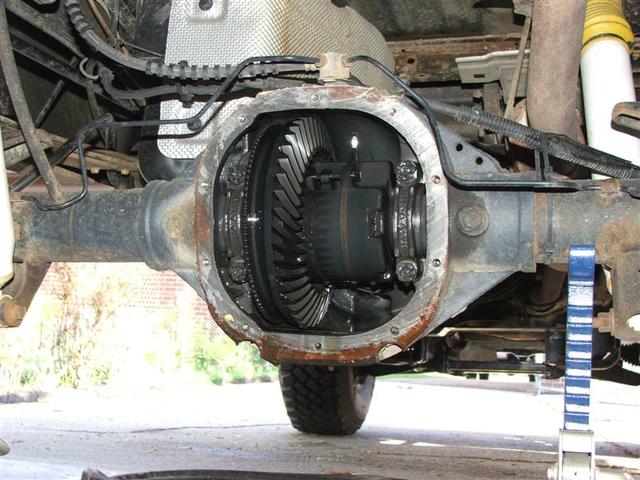
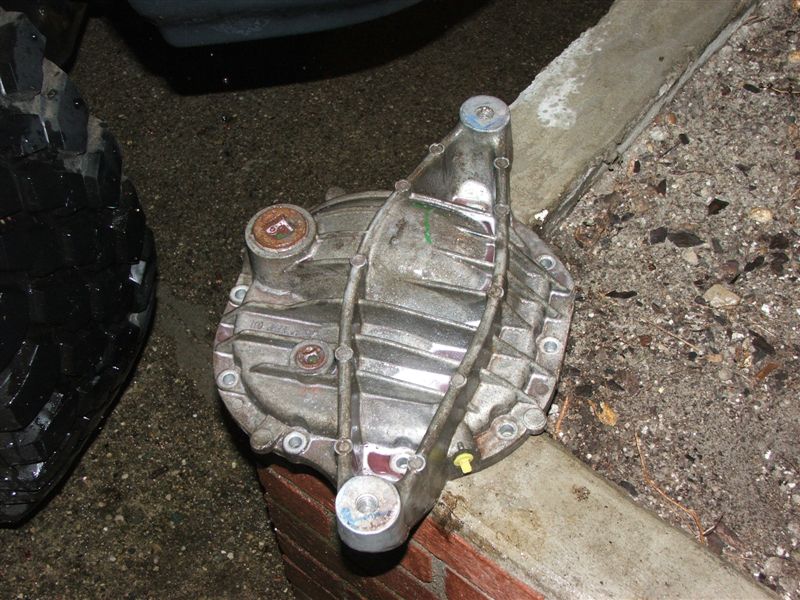
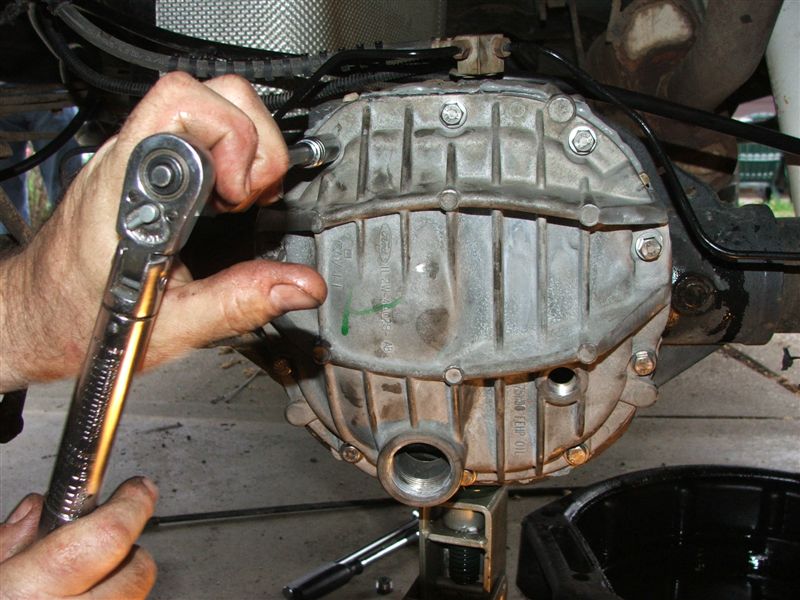
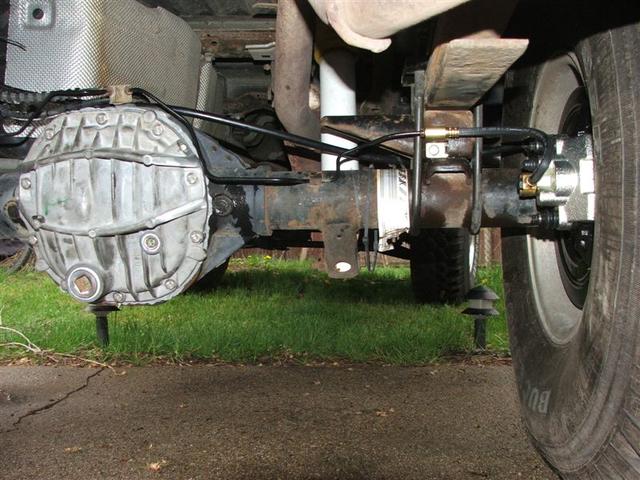
Now you can make the decision of installing the factory differential cover or upgrading to the explorer aluminum differential cover which I did. You don�t have to do this but it compliments the truck nicely.
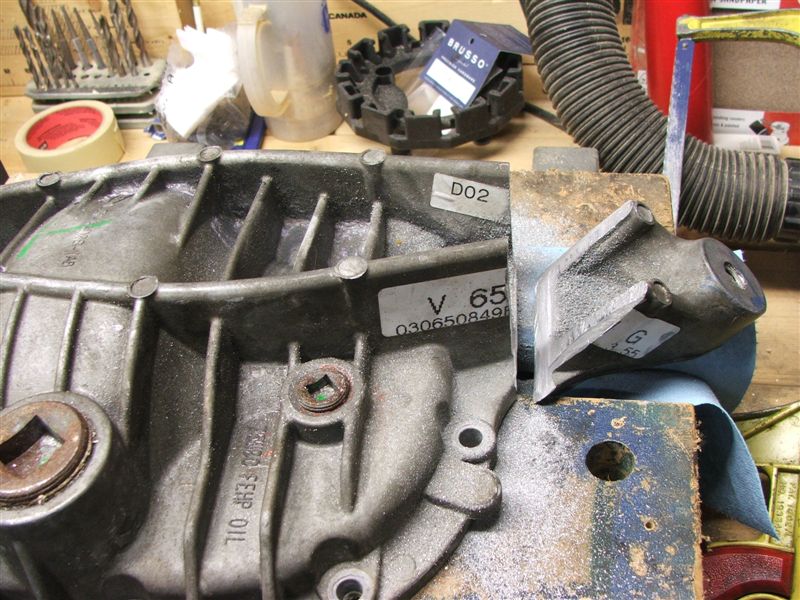
This is the way you will obtain the cover.
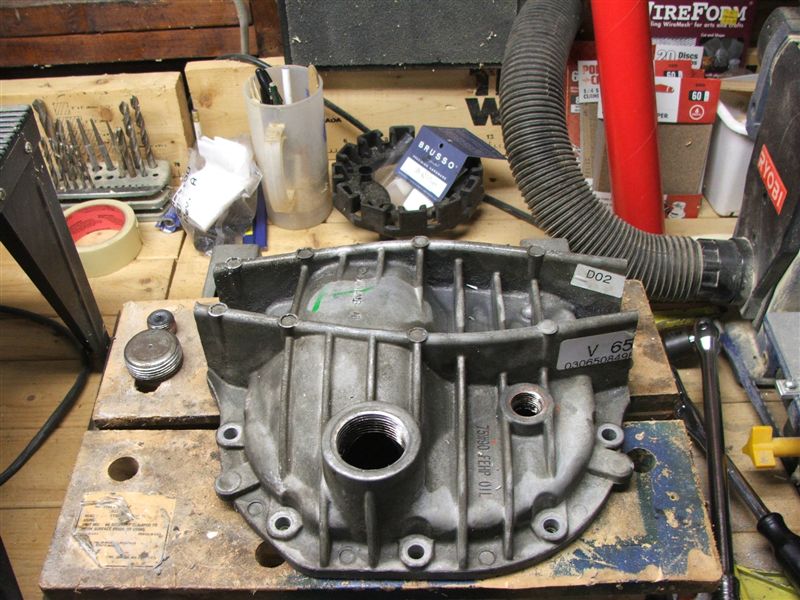
And pictures of the progress until the finished product was obtained. I could have done a little more finish work to it or even applied a few coats of paint but was under some time constraints and wanted to get it done. Overall I am pleased with the way it turned out.
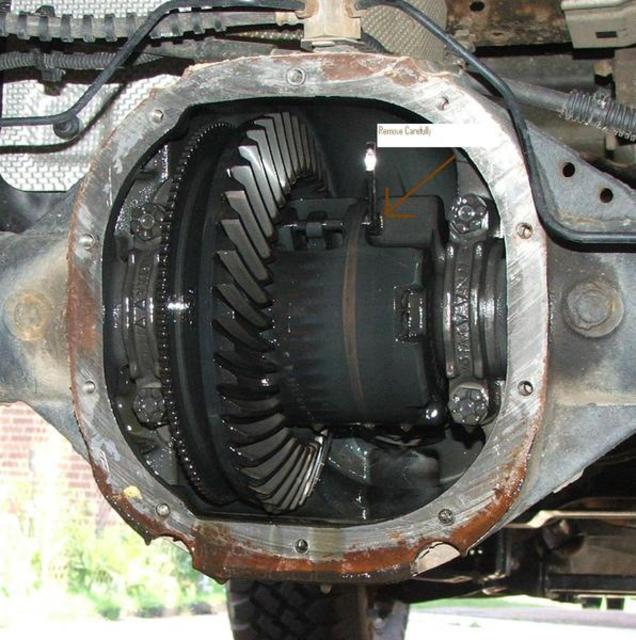
Either stock or aftermarket differential cover bolts needs to be torqued to 33 lbs. ft. I used some GM assembly adhesive on mine but you can also use RTV. Clean the surface of the differential cover and differential housing with brake clean and rag, install the cover after sealer has been installed. Add the fluid that your vehicle requires. The 31 spline torsen that I have requires 75w-140 full synthetic. It took about four quarts to fill.
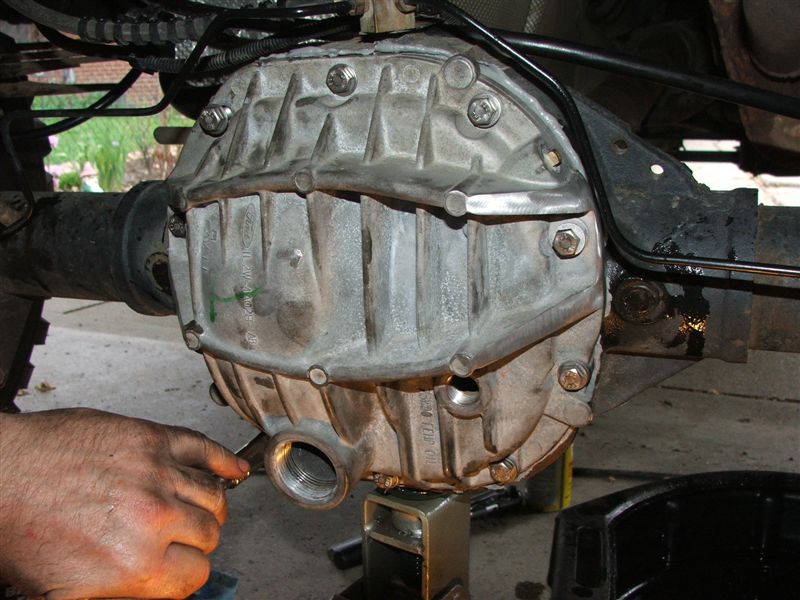
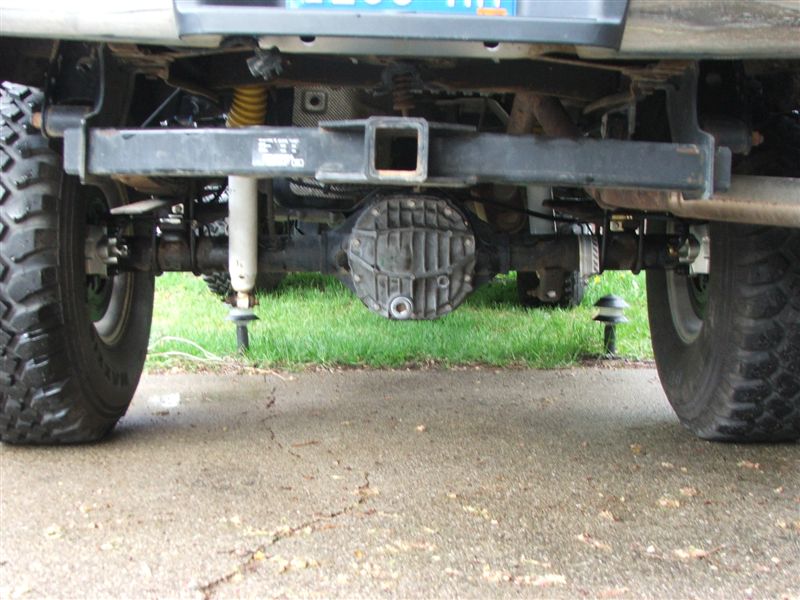
And the finished product.
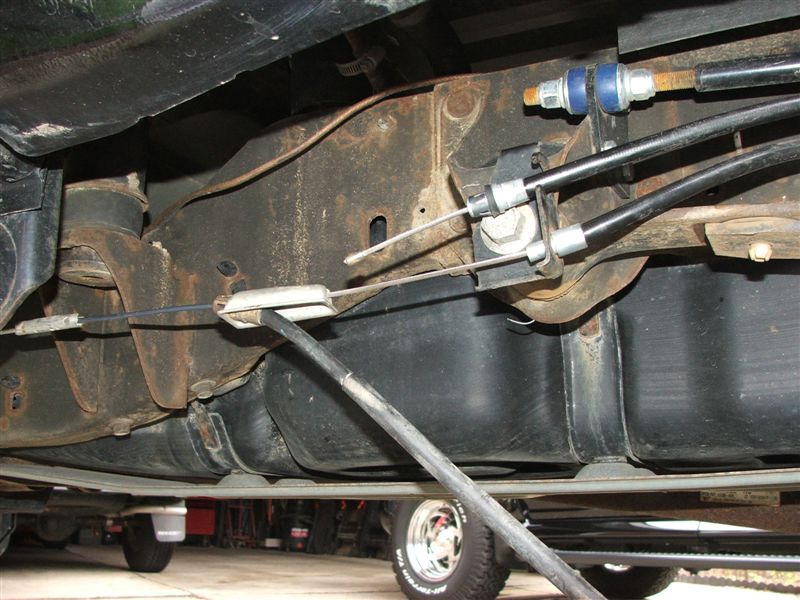
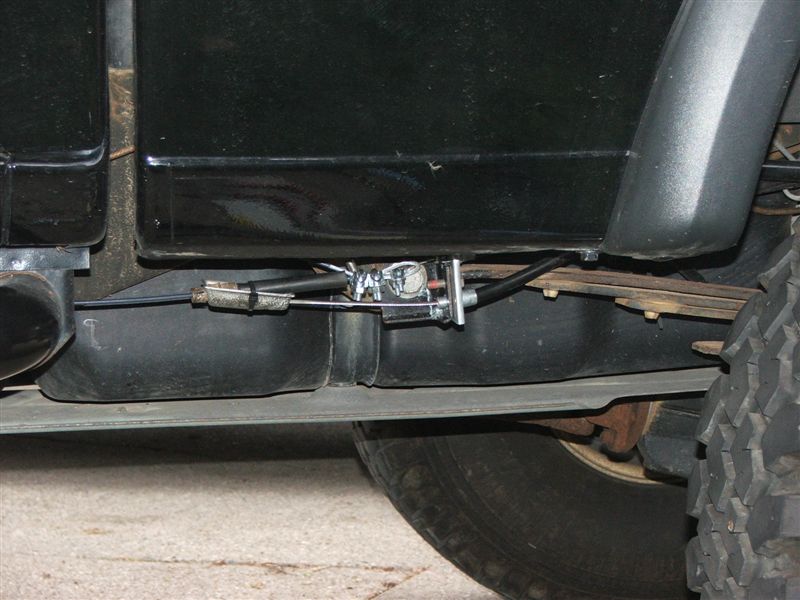
So the parking brake was another story, I went to the junkyard and purchased a used cable as a new one from the parts store was $30, I paid $4.50 from the junkyard.
First you wanna mount the new cable in the equalizer as we will call it, its the metal peice that both cables mount to.
Cut a good 12-18 inch section off of the old cable. You want to make sure that you have the retaining clip on one side that hooks into the equalizer like the stock cable does.
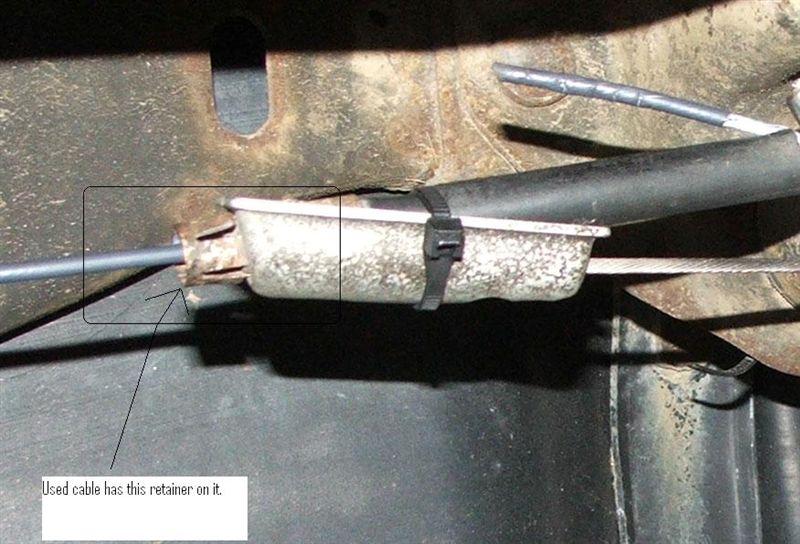
Now cut the casing off so the cable is exposed, I had to leave about a 4-5 inch peice on there as it will hold the equalizer in place when the cable is depressed. Purchase some cable ferrules from the hardware store. I used two 3/8 and one 1/4 inch. When you attach these make sure to remove the coating from the cable or it will not hold.
Next is to make a bracket for the new cables from the explorer to rest in. We had some spare aluminum sitting around, drill and tap a hole for attachment to the existing ebrake cable bracket.
Pull tension on the cable and push the equalizer towards the front of the truck, this may take two people as its kinda of odd to work with.
Secure the Ferrule on the cable, loop the cable over and then install the larger ferulle's to reinforce the clamp.
The finished product, not the prettiest thing in the world but it is fully functional now.
This installation was done on the 31 spline axle of a Level II and that this kit will only fit that axle. In other words, the major components will only bolt on to the axle in a 2002 FX4 or a 2003-on Level II. As you know, adapting it to the much more common 28-spline axle would require significant modification of the caliper mounting castings and/or the axle flanges.
Tools/Equipment needed:
* Basic hand tools and a good mechanics wrench set.
First of all we will lay out the parts list.
Ford Racing Parts Rear Disc Brake kit � M-2300-G $300.00-$375.00
Parking brake cables from local parts store or junkyard from 96-01 Explorer - $75.00
Two passenger side brake hoses from local parts store or junkyard from 96-01 Explorer - $40.00
Banjo bolts for rear calipers � Ford Part Number -385116-s2 - $5.00-$7.00
Spider block bolt (If reusing the old one apply thread locker) - $4.00
75w-140 Gear Lube (I used Mobil 1 SynPower Full Synthetic as this was what they had at the parts store) - $15.99 a quart, mine took four quarts.
http://www.fordracingparts.com/parts...tKeyField=1790
This is the kit from ford racing the link to it is above.
Direct Quote from the website:
This rear disc brake kit may be low buck, but it really works! Kit includes 11" rotors, calipers, mounting brackets and attaching hardware. The rotors have the popular 5-hole, 4.5" diameter passenger car bolt pattern. Caliper mounting brackets fit the popular 8.8" Truck/9" Late Ford axle housings with 2" x 3.56" pattern and big 3.15" diameter bearing. This kit is designed for vehicle installations with a 2.5" brake gap (housing flange-to-axle shaft flange).
The reason I highlight this is due to my ignorance when I measured the brake gap. This caused me some really unneeded stress and aggravation. You have to measure from the axle housing flange to the outside of the axle. It should be 2.5 inches. The other part is this will only bolt up to a 31 spline big bearing axle.
I used the parking brake cables and rear brake hoses from a 99 Ford Explorer 4wd and am currently investigating other options for the passenger parking brake cable as it is not long enough.
This kit has also been made to work on the 28 spline 8.8 axles by welding up the mounting plate and backing plate holes, redrilling the holes and then mounting. Not sure if I would go this direction but will include the link for your viewing.
http://www.therangerstation.com/Maga...isc_brakes.htm
Now to the good parts.
1. Chock the front tires in the front and rear to reduce the chance of the vehicle rolling.
2. Jack the rear axle up and support with jack stands.
3. Remove the tires and place off to the side for later reinstallation.
4. Remove the brake drums (They make take some kind taps from a hammer to be removed)
5. Remove the brake shoes and hardware from the backing plates.
Pull some slack down in the emergency brake cable and clamp the line up front at the frame. If you have done a body lift then you should know how to do this already. With the line clamped you should have slack in the line like this.
Separate the intermediate cable from the rear cable so the rear lines can be removed from the truck. This is where the two lines meet and connect the cable that goes to the front of the truck. There are a few retainers on top of the axle that have to be released to remove the cable. I have found that a pair of needle noise pliers works best to release the retainers from the lines.
Place a drain pan under the rear axle and remove the lower bolts working your way up to the top bolts. Reason for this it will allow the bottom of the cover to come out slowly and reduce the chance of a mess.
Remove the bolt/pin from the rear axle that holds the spider block. Be careful with this bolt as it pretty tight and can snap easily. I purchased a new one for a few dollars at the Ford Dealer.
Remove Spider block, Make sure to reinstall in the original orientation.
Push the axles in and remove the �C� clips in the center of the differential. You have to repeat this for each axle.
Remove the axles from the axle housing, try not to drag the axle across the seals during removal to prevent damage. Place a rag or drain bucket under the axle housing as there will some fluid from the housing flange. With the axle removed it should look like this, also a picture of one of the axles upright.
Remove the brake lines from the wheel cylinders on each side. You can leave the wheel cylinders attached to the backing plates as I did.
Remove the backing plate from the axle, there are four nuts and bolts that have to be removed and should just pull off once those are removed. With the backing plate removed this is what you end up with.
Clean up the axle housing surface and install the new disc brake backing plate/parking brake assembly. Reassembly was with nuts and bolts as well, torque nuts and bolts to 40-50 lbs. ft.
Here is where it sucks. You have to remove the parking brake shoes, springs and retainers in order to install the axle. Reason being is the axle will not slide in enough to reinstall the �C� clips. There is a spring on the bottom by the adjuster, a spring at the top in front of the shoes and a spring in the back behind the shoes.
Once parking brake shoes and hardware is removed reinstall the axle for the side you are working on, once you install the �C� clip then pull back on the axle to seat the �C� clip.
Here is a picture of the parking brake hardware that has to be removed. Installation of all these springs is pretty fun after the axle is installed. Just take your time and think it through. Repeat this process for the opposite side.
Once the axle and parking brake assembly was reinstalled I installed the rotors and calipers to check clearance. It is not necessary to do this but better be safe then sorry.
Once both axles are reinstalled go ahead and do yourself a favor, reinstall the spider block and bolt. If you did not purchase a new bolt coat the original with thread lock. It is not something that you want backing out. The bolt should be torqued to 22 lbs. ft.
Mount the calipers and rotors for fitting of the brake lines. I used 99 explorer passenger side flex hoses and the original metal brake lines. Torque the banjo bolts to 25 lbs. ft. (bolt that attaches the brake hose to the caliper, make sure you install the brass crush washers. They are one time use.) Route the hoses to the lift block and center punch the holes. Drill two holes and tap the one hole where the bolt will be installed. The other hole is for the bracket locator tab.
Left side
Right side
Once the hoses are mounted you can then cut the brake line on the truck to adapt to the new brake hoses. Luckily in our arsenal of tools we had a double flaring kit to flair the lines once cut. The brake lines on my truck are 3/16 and should be pretty standard on the rangers. Remember to leave yourself some room for error when cutting the lines. If you don�t then it may be off to the parts store for some new line.
Here is the finished product of the new hoses and reflaired brake lines. Ever thing is mounted and torqued at this time.
Now you can make the decision of installing the factory differential cover or upgrading to the explorer aluminum differential cover which I did. You don�t have to do this but it compliments the truck nicely.
This is the way you will obtain the cover.
And pictures of the progress until the finished product was obtained. I could have done a little more finish work to it or even applied a few coats of paint but was under some time constraints and wanted to get it done. Overall I am pleased with the way it turned out.
Either stock or aftermarket differential cover bolts needs to be torqued to 33 lbs. ft. I used some GM assembly adhesive on mine but you can also use RTV. Clean the surface of the differential cover and differential housing with brake clean and rag, install the cover after sealer has been installed. Add the fluid that your vehicle requires. The 31 spline torsen that I have requires 75w-140 full synthetic. It took about four quarts to fill.
And the finished product.
So the parking brake was another story, I went to the junkyard and purchased a used cable as a new one from the parts store was $30, I paid $4.50 from the junkyard.
First you wanna mount the new cable in the equalizer as we will call it, its the metal peice that both cables mount to.
Cut a good 12-18 inch section off of the old cable. You want to make sure that you have the retaining clip on one side that hooks into the equalizer like the stock cable does.
Now cut the casing off so the cable is exposed, I had to leave about a 4-5 inch peice on there as it will hold the equalizer in place when the cable is depressed. Purchase some cable ferrules from the hardware store. I used two 3/8 and one 1/4 inch. When you attach these make sure to remove the coating from the cable or it will not hold.
Next is to make a bracket for the new cables from the explorer to rest in. We had some spare aluminum sitting around, drill and tap a hole for attachment to the existing ebrake cable bracket.
Pull tension on the cable and push the equalizer towards the front of the truck, this may take two people as its kinda of odd to work with.
Secure the Ferrule on the cable, loop the cable over and then install the larger ferulle's to reinforce the clamp.
The finished product, not the prettiest thing in the world but it is fully functional now.
Last edited by 04lvl2; May 1, 2006 at 09:08 PM. Reason: title edit


Member

Joined: Jul 2015
Posts: 2
Likes: 0
From: Powell River B.C.
disc conversion
thanks for the awesome post was wondering why you need 2 left cables and not a left and a right ? thats the big question other one is now that brake kit is no longer availabke do you have any other ideas on how to get a kit like that ?

Found a Kit on evil Bay, say Ford Racing and the Ford Part number, have a decent price but still wondering about the fitment, any comments !
Also, my anti braking system was removed by a very uninformed Back-Yard Mechanic.
Now I have a major problem with braking and it is going cost me to fix it.
While I have things apart, does anyone know of a good External Mounted ABS System that will fit my 2002 FX4 Rear Axle.
Also, my anti braking system was removed by a very uninformed Back-Yard Mechanic.
Now I have a major problem with braking and it is going cost me to fix it.
While I have things apart, does anyone know of a good External Mounted ABS System that will fit my 2002 FX4 Rear Axle.
The 2003 factory 4WABS is quite good and definitely the way to go IMO. Besides being factory matched to your truck, it also has an inherent advantage for a disc swap. Unlike 2000 and earlier, the 01+ brake proportioning is performed in the software, not by a mechanical proportioning valve. This means that you can, within reason, swap non-standard brake parts and the ABS should automatically adjust for the difference.
I have Cadillac Eldorado calipers and Mustang SVO rotors on my LII and it works perfectly. When Bill and I swapped the M-2300-G Explorer kit onto his LII, the results were equally good.
I have Cadillac Eldorado calipers and Mustang SVO rotors on my LII and it works perfectly. When Bill and I swapped the M-2300-G Explorer kit onto his LII, the results were equally good.


Thread
Thread Starter
Forum
Replies
Last Post
My91Ranger
General Technical & Electrical
36
Nov 20, 2024 12:40 AM
Dangerranger01
Engine & Drivetrain
177
Mar 26, 2022 05:04 PM
V8 Level II
General Technical & Electrical
38
Sep 11, 2007 08:01 PM


