
Once again, my Ranger is PARKED.
#76
 02-01-2007


#77
02-01-2007

Join Date: Dec 2005
Location: The Keystone State
Posts: 4,521
Likes: 0
Received 0 Likes
on
0 Posts
#78
02-01-2007
Originally Posted by Needforspeed3685
Can someone please identify this device? I had two vacuum connections and one sensor. It it just a vacuum sensor?
http://i20.photobucket.com/albums/b2...nowndevice.jpg
It is bolted to the side of the ignition module support bracket, which is integrated into the alternator bracket.
http://i20.photobucket.com/albums/b2...nowndevice.jpg
It is bolted to the side of the ignition module support bracket, which is integrated into the alternator bracket.
#79
02-01-2007
Originally Posted by Rockledge
It looks like the Electronic Vacuum Regulator (EVR) which is part of the EGR system.
My Haynes manual calls it a vacuum regulator solenoid. It receives a signal from the PCM to operate the EGR valve.
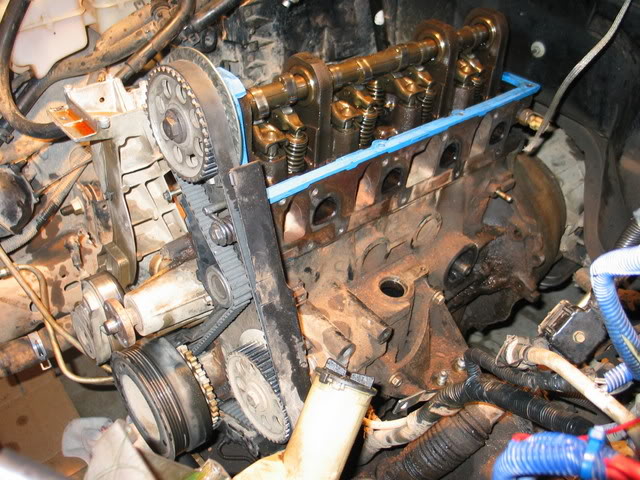
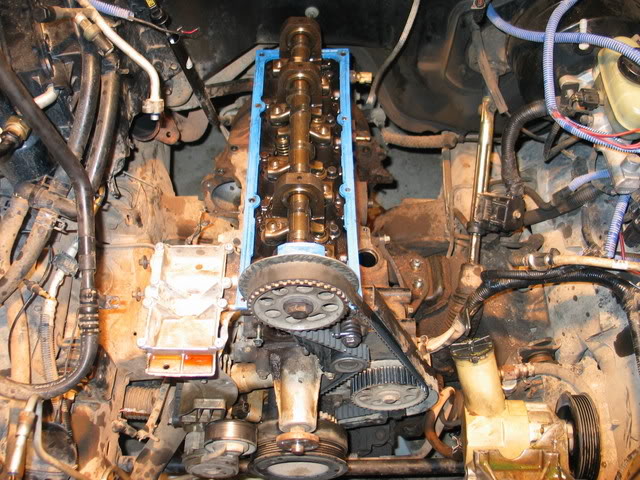
I got the A/C system discharged, even though it gave me a tremendous headache. Literally...Freeon must not be good on the brain or something, because the few seconds I was exposed to the high-pressure gas I immediately got a headache and it continued for a good 4 hours despite taking some acetaminophen. I removed the exhaust manifold and disconnected the wiring to the starter. This really finished the passenger's side of the engine, as far as prep for removal goes. Now I need to get the power steering pump removed from the bracket and get the bracket out of the way. I'll have to hit O'Reilly's tomorrow for a spring-lock coupler disconnect tool...used on the fuel and A/C fittings.
I wonder if I'll have to remove the A/C accumulator to accomidate the 302???
Last edited by Needforspeed3685; 02-01-2007 at 07:54 PM.
#80
02-01-2007
Well I am exhausted...
I got everything done. The motor is resting on the mounts under it's own weight. It's supported by the transmission and motor mounts.
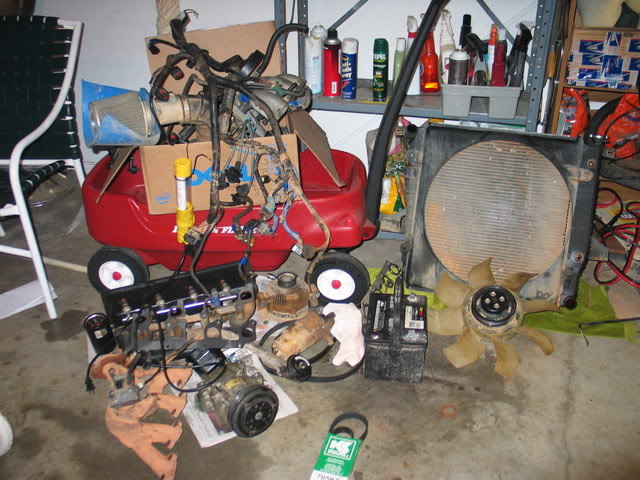
The wiring harness was the biggest octopus I have every seen!!! If I hadn't of labeled the connections, it would be like a puzzle putting it back on!!!
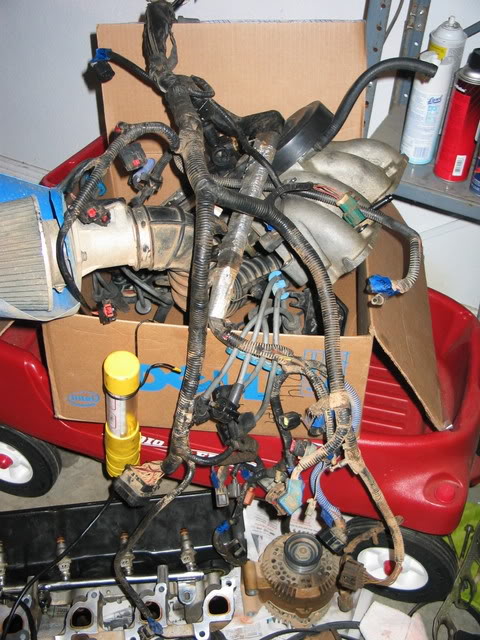
I had to remove a lot more than I had anticipated, as you can see. I still need to disconnect an A/C line (at the accumulator), and the power steering lines along with draining the power steering fluid. I got up in the attic momentarily to start bracing the ceiling joist, but was simply too worn out to bend over any longer.
Not bad for a day's worth of work, in my opinion. Especially since I shoveled the driveway and sidewalk, played with my daughter in the snow, and took many breaks to rest and eat.
As you can see, my Little Red Wagon-O-Parts
has all but disappeared beneath the parts pile now:
I got everything done. The motor is resting on the mounts under it's own weight. It's supported by the transmission and motor mounts.
The wiring harness was the biggest octopus I have every seen!!! If I hadn't of labeled the connections, it would be like a puzzle putting it back on!!!
I had to remove a lot more than I had anticipated, as you can see. I still need to disconnect an A/C line (at the accumulator), and the power steering lines along with draining the power steering fluid. I got up in the attic momentarily to start bracing the ceiling joist, but was simply too worn out to bend over any longer.
Not bad for a day's worth of work, in my opinion. Especially since I shoveled the driveway and sidewalk, played with my daughter in the snow, and took many breaks to rest and eat.
As you can see, my Little Red Wagon-O-Parts
has all but disappeared beneath the parts pile now:
Last edited by Needforspeed3685; 02-01-2007 at 09:29 PM.
#81
02-01-2007
To get the engine disconnected from the bell housing, I will have to support the engine from the rear and let the tranny rest onto the tranny crossmember. Then once I get the motor pulled, it would leave me room to pull the catalytic converter and transmission.
I guess the best way to disconnect the transmission from the driveline would be to remove the driveshaft at the rear differential, then pull it out away from the transmission...right???
I guess the best way to disconnect the transmission from the driveline would be to remove the driveshaft at the rear differential, then pull it out away from the transmission...right???
#82
02-02-2007
#83
02-02-2007
Originally Posted by Mark98xlt
The rear driveshaft should just pull out if disconnected, it did when i was doing my rear end work when dropping my truck rather easy.
BTW with the 5.0 swap are you seriously going to run the 7.5 rearend?
BTW with the 5.0 swap are you seriously going to run the 7.5 rearend?
I know my current 7.5 with no maintenance performed in the whole life of the truck would not last long at all...plus there's no way I would put an open differential behind that kind of power.
What do the Explorer's have behind them? I defiantly want a Limited Slip!
I had trouble getting the top transmission bolt on the passenger's side removed. Does anyone know of a better way to get to this bolt???
Last edited by Needforspeed3685; 02-02-2007 at 09:49 AM.
#84
02-02-2007

Join Date: Dec 2006
Location: Lehi, Utah
Posts: 731
Likes: 0
Received 0 Likes
on
0 Posts
#85
02-02-2007
Originally Posted by D94R
Explorers have the 8.8 with the stronger 31 spline axles. They rear ends are also physically wider than the ranger rear end.
pre 95 they had drum brakes, post 95 they have disk brakes.
pre 95 they had drum brakes, post 95 they have disk brakes.
I've got plenty of time to do the research, as I'm looking at the whole day today to get the motor pulled, tranny dropped, and engine bay cleaned up!
Last edited by Needforspeed3685; 02-02-2007 at 09:59 AM.
#87
02-02-2007
Originally Posted by Mark98xlt
I know the 7.5 will last a little bit behind the 5.0 if you dont abuse it, but once you start ragging on it say goodbye.
Exactly what I wanted to hear, my friend....
I will run with it until it blows up on me. Then I'll have the reason to spend the money on an 8.8 LS.
#88
02-02-2007

Join Date: Feb 2007
Location: brooklyn, ct
Posts: 1
Likes: 0
Received 0 Likes
on
0 Posts
Originally Posted by fddriver02
should have bought a yota. haha i wish i did
#89
02-03-2007
SUCCESS!!!
......well kindof.......
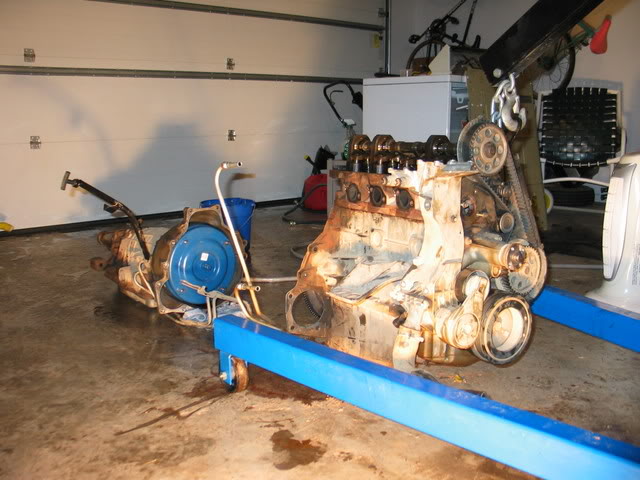
I got the engine and transmission pulled out!
However, it wasn't an easy job, since I was alone and had no help whatsoever...
Once I got the tranny x-member pulled I STILL could not remove the flywheel-to-torque converter bolts. This made me decide to pull both the engine and tranny out together.
Once I drained most of the tranny fluid out into a bucket, I started lifting the engine by the factory supplied bracket. However this caused the tranny to dip backwards, and ended up DUMPING my bucket of a good half-gallon of tranny fluid onto my nice, clean garage floor.
"Oh well...I'll ice-skate around the garage to finish the engine removal!"
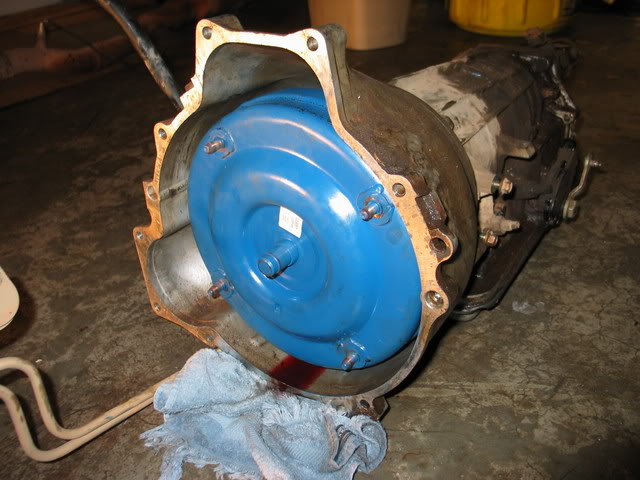
Now that it's all out, I could see my nice new torque converter hanging there...Who would have thought it would be FULL of MORE fluid!
Thank goodness I had a mess already, because removing the torque converter made a bigger mess!!! On a side note, the torque converter was flawless, and had a manufacture date sticker that said 7/5/06!
Now, after 10 full-size towels, 3 days worth of newspaper, a half-gallon of gasoline, and a whole hot-water heater worth of steaming hot water, I got the floor drying under a super-fan, hoping my ice rink will all but disappear!
Here's a tip...
If ANYONE ever decides to lift an engine by the factory-supplied lift bracket, DON'T DO IT! This thing was cheap, weak, and I truly feared my life every time I stuck a finger underneath that engine while it was still lifted.
As you can see...the combined weight of the engine and transmission caused this bracket to bend
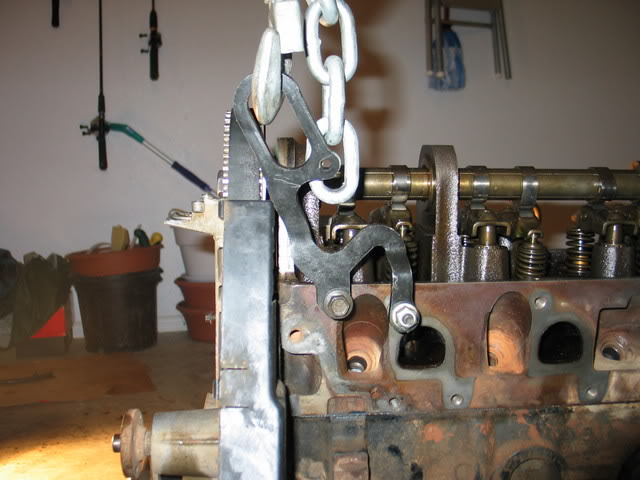
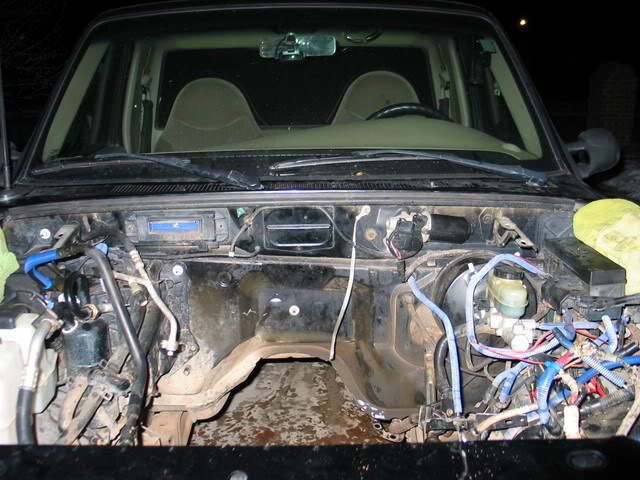
Keep in mind, I was doing this totally ALONE in my 2-bay garage....it was quite an effort to work that engine/tranny out, without hitting the ceiling of the garage or the core support of the truck!
Here are the results:
......well kindof.......
I got the engine and transmission pulled out!
However, it wasn't an easy job, since I was alone and had no help whatsoever...
Once I got the tranny x-member pulled I STILL could not remove the flywheel-to-torque converter bolts. This made me decide to pull both the engine and tranny out together.
Once I drained most of the tranny fluid out into a bucket, I started lifting the engine by the factory supplied bracket. However this caused the tranny to dip backwards, and ended up DUMPING my bucket of a good half-gallon of tranny fluid onto my nice, clean garage floor.
"Oh well...I'll ice-skate around the garage to finish the engine removal!"
Now that it's all out, I could see my nice new torque converter hanging there...Who would have thought it would be FULL of MORE fluid!
Thank goodness I had a mess already, because removing the torque converter made a bigger mess!!! On a side note, the torque converter was flawless, and had a manufacture date sticker that said 7/5/06!
Now, after 10 full-size towels, 3 days worth of newspaper, a half-gallon of gasoline, and a whole hot-water heater worth of steaming hot water, I got the floor drying under a super-fan, hoping my ice rink will all but disappear!
Here's a tip...
If ANYONE ever decides to lift an engine by the factory-supplied lift bracket, DON'T DO IT! This thing was cheap, weak, and I truly feared my life every time I stuck a finger underneath that engine while it was still lifted.
As you can see...the combined weight of the engine and transmission caused this bracket to bend
Keep in mind, I was doing this totally ALONE in my 2-bay garage....it was quite an effort to work that engine/tranny out, without hitting the ceiling of the garage or the core support of the truck!
Here are the results:
#90
02-03-2007
Join Date: Dec 2006
Location: Lehi, Utah
Posts: 731
Likes: 0
Received 0 Likes
on
0 Posts

#93
02-04-2007
Join Date: Dec 2006
Location: Lehi, Utah
Posts: 731
Likes: 0
Received 0 Likes
on
0 Posts
Originally Posted by 04 EDGE
when using the proper engine hoist the factory lift hooks work fine. using a setup like you have is more dangerous the using the factory lift hooks.
ford wouldnt put them there if they were not safe.
ford wouldnt put them there if they were not safe.

#95
02-04-2007
Thanks guys for all the advice and kind replies. I wire-brushed the extra greasy surfaces in the engine bay earlier, and will pressure wash it as soon as my water hose thaws out! While I'm at it I'm going to pressure wash the garage floor after spreading an acidic concrete cleaner solution on it and letting it soak.
The 302 swap will begin after I find a rolled Explorer. I'm unemployed at the moment, and only have 2 classes a day Monday through Thursday, so I'll have every afternoon after 3pm and nice long weekends to work on it. I'll be driving the fastest Ford Ranger in Arkansas before my birthday in March!!!
I only had one hook. Is there supposed to be another??? I had a chain with me, and thought about going to the trouble to bolt it up to the block, but after I started lifting the motor/tranny out, it appeared to withstand the weight okay once it bent into position.
The 302 swap will begin after I find a rolled Explorer. I'm unemployed at the moment, and only have 2 classes a day Monday through Thursday, so I'll have every afternoon after 3pm and nice long weekends to work on it. I'll be driving the fastest Ford Ranger in Arkansas before my birthday in March!!!
Originally Posted by D94R
Re-looking at the pictures I see only one of the hooks were used, answering the reason why it was bent for sure.
#96
02-04-2007
Join Date: Dec 2006
Location: Lehi, Utah
Posts: 731
Likes: 0
Received 0 Likes
on
0 Posts
#97
02-04-2007
The only brackets mounted to the head or block on the exhaust side were the Alternator/ignition bracket, and the EGR transducer brackets. However, after I removed the EGR bracket, I didn't think to put it back on before lifting the engine. You can actually see it laying on top of the exhaust manifold in my "parts pile" picture.


Last edited by Needforspeed3685; 02-04-2007 at 10:45 PM.
#99
02-05-2007
Join Date: Dec 2006
Location: Lehi, Utah
Posts: 731
Likes: 0
Received 0 Likes
on
0 Posts


Thread
Thread Starter
Forum
Replies
Last Post
Konad
General Technical & Electrical
3
11-19-2011 06:24 PM


