Project Logs For detailed builds specific to the Ford Ranger, one thread per vehicle please.

93 ford ranger complete rebuild from bare frame with SAS

Thread Tools
 
Search this Thread
 
  #151  
Old 08-22-2011
mcramer15's Avatar
Member
Thread Starter
Join Date: Jun 2010
Location: Alma Center, WI
Posts: 8
Likes: 0
Received 0 Likes on 0 Posts
NP205 Twin Shifters

I decided to go a different direction with my twin shifters for my t-case. I decided I want to clock my 205 up to about level so it doesn't hang below my fame. Doing this will really screw up the position of the rails relative to the shifters. So... I am going to fab up my own cable shifters. I ran across someone that did this on Pirate4x4 and it doesnt look to hard. Plus Its a whole lot cheaper then buying NWF's version. I will keep you all posted of my clocking process and the cable build. It will be a couple weeks though.
 
  #152  
Old 08-23-2011
mcramer15's Avatar
Member
Thread Starter
Join Date: Jun 2010
Location: Alma Center, WI
Posts: 8
Likes: 0
Received 0 Likes on 0 Posts
Twin Sticks for Cable Shifter

This is a possible concept of a shifter I may make for my setup. What do you think? I will have the cover that the cable assembly done later.

Name:  TwinStickShifter.png
Views: 230
Size:  126.0 KB
 
  #153  
Old 08-25-2011
mcramer15's Avatar
Member
Thread Starter
Join Date: Jun 2010
Location: Alma Center, WI
Posts: 8
Likes: 0
Received 0 Likes on 0 Posts
Possible new rear bumper to match the front.

I modeled this one up trying to get a style more like the front. Let me know what you think.

Name:  RearTubeBumper.png
Views: 266
Size:  1.45 MB
Name:  RearTubeBumper1.png
Views: 232
Size:  78.2 KB
Name:  RearTubeBumper2.png
Views: 222
Size:  98.0 KB
 
  #154  
Old 08-25-2011
seed60's Avatar
RF Veteran
iTrader: (15)
Join Date: Jun 2008
Location: Mooresville, NC
Posts: 5,584
Likes: 0
Received 0 Likes on 0 Posts
Looks awesome!!
 
  #155  
Old 08-25-2011
mcramer15's Avatar
Member
Thread Starter
Join Date: Jun 2010
Location: Alma Center, WI
Posts: 8
Likes: 0
Received 0 Likes on 0 Posts
Icon10

Thanks!
 
  #156  
Old 08-25-2011
morris's Avatar
RF Veteran
iTrader: (5)
Join Date: Feb 2008
Location: South Detroit.
Posts: 7,841
Likes: 0
Received 2 Likes on 2 Posts
i like it too, im not feeling the mounts for the clevis' though. they might look better sticking out a little. maybe add a triangle piece and putting the hole closer to the rear of the truck.
 
  #157  
Old 08-25-2011
SteelDirigible's Avatar
Member
iTrader: (4)
Join Date: May 2010
Location: Lexington, KY
Posts: 3,670
Likes: 0
Received 2 Likes on 2 Posts
on the bumper you might want the receiver hitch out a little more, right now you dont have anywhere for the pin to go.
 
  #158  
Old 08-25-2011
mcramer15's Avatar
Member
Thread Starter
Join Date: Jun 2010
Location: Alma Center, WI
Posts: 8
Likes: 0
Received 0 Likes on 0 Posts
Originally Posted by SteelDirigible
on the bumper you might want the receiver hitch out a little more, right now you dont have anywhere for the pin to go.
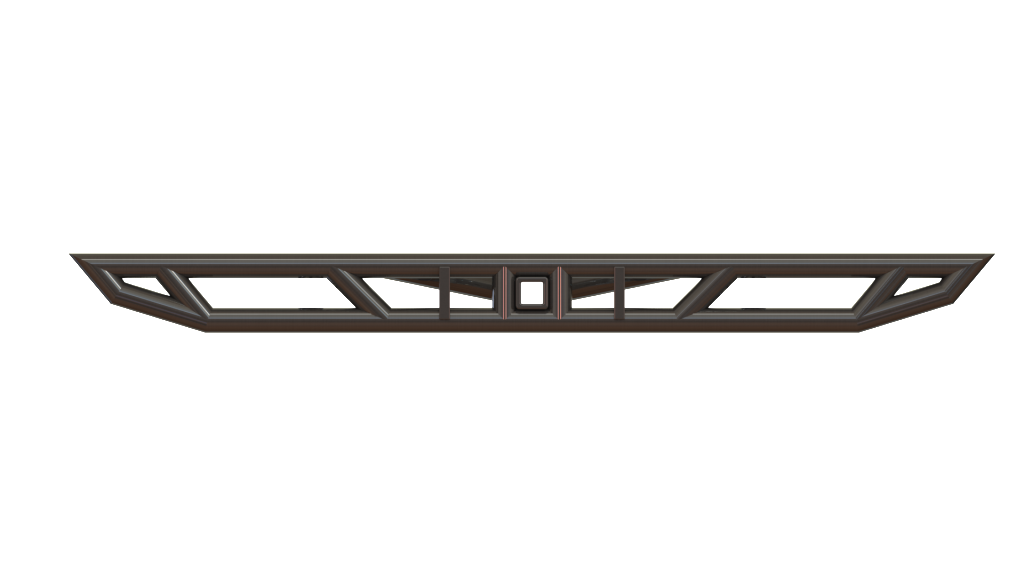
Ya I wasn't sure where the hole is for that. I was thinking if the bar is in the way I could drill a new hole for the receiver and anything I put in there. I kinda like it being flush with the rest of the bumper
 
  #159  
Old 08-25-2011
SteelDirigible's Avatar
Member
iTrader: (4)
Join Date: May 2010
Location: Lexington, KY
Posts: 3,670
Likes: 0
Received 2 Likes on 2 Posts
you could take out the bar on either side and it would still be flush. maybe put a plate on the back side around the hitch if you think you need the extra strength. otherwise you will need a long pin to go through the receiver tube and both bars.
 
  #160  
Old 08-25-2011
mcramer15's Avatar
Member
Thread Starter
Join Date: Jun 2010
Location: Alma Center, WI
Posts: 8
Likes: 0
Received 0 Likes on 0 Posts
I think I would leave the bars in for strength and I couldnt get that big of pin in due to where the clevis mounts are. Im not sure, I can figure something out. I think I could drill a new hole right behind the bars and be fine.
 
  #161  
Old 08-26-2011
SteelDirigible's Avatar
Member
iTrader: (4)
Join Date: May 2010
Location: Lexington, KY
Posts: 3,670
Likes: 0
Received 2 Likes on 2 Posts
how thick is the tube?
 
  #162  
Old 08-26-2011
mcramer15's Avatar
Member
Thread Starter
Join Date: Jun 2010
Location: Alma Center, WI
Posts: 8
Likes: 0
Received 0 Likes on 0 Posts
Originally Posted by SteelDirigible
how thick is the tube?
1.75 x .125
 
  #163  
Old 08-26-2011
mcramer15's Avatar
Member
Thread Starter
Join Date: Jun 2010
Location: Alma Center, WI
Posts: 8
Likes: 0
Received 0 Likes on 0 Posts
Is that the normal thickness people use or is it 3/16?
 
  #164  
Old 09-07-2011
mcramer15's Avatar
Member
Thread Starter
Join Date: Jun 2010
Location: Alma Center, WI
Posts: 8
Likes: 0
Received 0 Likes on 0 Posts
On Board Air

Do any of you run a York Compressor on your rig or on board air? I have read a few things on it but really haven't gotten a grasp whether it is difficult or not.. I think I might have a York sitting in my barn. I took something off my first engine that was big and ugly that looked like one so I thought if I have it, it would be a good idea to try and use it. Next time I am back to my "shop" I will double check to see if it really is a York and what stroke it is.

Thanks
 
  #165  
Old 09-11-2011
mcramer15's Avatar
Member
Thread Starter
Join Date: Jun 2010
Location: Alma Center, WI
Posts: 8
Likes: 0
Received 0 Likes on 0 Posts
updates

Finally I got some pictures for you all. It starts out with my first idea of clocking my np205 flat. O and I got my cables in to make my "Cable shifters"


I first measured the diameter of the adapter and then punched it out and transfered the holes from the adapter on it. I got at far as redrilling new holes before I found a great craigs list deal.


Attached Thumbnails 93 ford ranger complete rebuild from bare frame with SAS-dsc03585.jpg   93 ford ranger complete rebuild from bare frame with SAS-dsc03586.jpg   93 ford ranger complete rebuild from bare frame with SAS-dsc03591.jpg   93 ford ranger complete rebuild from bare frame with SAS-dsc03593.jpg   93 ford ranger complete rebuild from bare frame with SAS-dsc03594.jpg  

93 ford ranger complete rebuild from bare frame with SAS-dsc03597.jpg   93 ford ranger complete rebuild from bare frame with SAS-dsc03598.jpg   93 ford ranger complete rebuild from bare frame with SAS-dsc03601.jpg  
  #166  
Old 09-11-2011
mcramer15's Avatar
Member
Thread Starter
Join Date: Jun 2010
Location: Alma Center, WI
Posts: 8
Likes: 0
Received 0 Likes on 0 Posts
After a quick look on craigs list I find a NP203 for cheap and only a half hour away. I ran, got it, and brought it back to my place of work to start taking it apart to clean it up and get it painted.


First the rear output comes off, then disconnet the shifting fork.


Next is the gear box.


The main shaft.


Got everything apart
ps. there is a crap ton of needle bearsings.


I took it all down to a shop to have them give it a good bath. Once I got it back I wire brushed the whole thing to get surface rust off, paint and any remaining grease.


Attached Thumbnails 93 ford ranger complete rebuild from bare frame with SAS-dsc03603.jpg   93 ford ranger complete rebuild from bare frame with SAS-dsc03604.jpg   93 ford ranger complete rebuild from bare frame with SAS-dsc03606.jpg   93 ford ranger complete rebuild from bare frame with SAS-dsc03607.jpg   93 ford ranger complete rebuild from bare frame with SAS-dsc03611.jpg  

93 ford ranger complete rebuild from bare frame with SAS-dsc03613.jpg   93 ford ranger complete rebuild from bare frame with SAS-dsc03678.jpg   93 ford ranger complete rebuild from bare frame with SAS-dsc03682.jpg   93 ford ranger complete rebuild from bare frame with SAS-dsc03683.jpg   93 ford ranger complete rebuild from bare frame with SAS-dsc03684.jpg  

  #167  
Old 09-11-2011
mcramer15's Avatar
Member
Thread Starter
Join Date: Jun 2010
Location: Alma Center, WI
Posts: 8
Likes: 0
Received 0 Likes on 0 Posts
This weekend I went over to Jed's and is Jed's machining, great guy by the way, and had a long talk with him. Of course I didnt go there just to talk, I picked up my high quality doubler adapter and new recut shaft.


Also this weekend I pulled my "truck" out of the "shop" and reorganized the shop and did a major clean up. Also I found my York (as far as I know) compressor and cleaned it up.

Kinda dark, sorry


By the way, how do you get the pulley off.... I wanted to get it off to tell what stroke I have.

This next week I will get everything powdercoated hopefully, then mocked put together to make my mount for the shifting cables.
 
Attached Thumbnails 93 ford ranger complete rebuild from bare frame with SAS-dsc03685.jpg   93 ford ranger complete rebuild from bare frame with SAS-dsc03687.jpg   93 ford ranger complete rebuild from bare frame with SAS-dsc03696.jpg   93 ford ranger complete rebuild from bare frame with SAS-dsc03693.jpg   93 ford ranger complete rebuild from bare frame with SAS-dsc03694.jpg  

  #168  
Old 09-16-2011
mcramer15's Avatar
Member
Thread Starter
Join Date: Jun 2010
Location: Alma Center, WI
Posts: 8
Likes: 0
Received 0 Likes on 0 Posts
Got it half way back together.


Attached Thumbnails 93 ford ranger complete rebuild from bare frame with SAS-dsc03697.jpg   93 ford ranger complete rebuild from bare frame with SAS-dsc03700.jpg   93 ford ranger complete rebuild from bare frame with SAS-dsc03702.jpg   93 ford ranger complete rebuild from bare frame with SAS-dsc03698.jpg   93 ford ranger complete rebuild from bare frame with SAS-dsc03699.jpg  

  #169  
Old 09-16-2011
mcramer15's Avatar
Member
Thread Starter
Join Date: Jun 2010
Location: Alma Center, WI
Posts: 8
Likes: 0
Received 0 Likes on 0 Posts
Got it mocked up for making some brackets for my cable shifters.


Attached Thumbnails 93 ford ranger complete rebuild from bare frame with SAS-dsc03708.jpg   93 ford ranger complete rebuild from bare frame with SAS-dsc03707.jpg   93 ford ranger complete rebuild from bare frame with SAS-dsc03705.jpg   93 ford ranger complete rebuild from bare frame with SAS-dsc03703.jpg  
  #170  
Old 09-16-2011
seed60's Avatar
RF Veteran
iTrader: (15)
Join Date: Jun 2008
Location: Mooresville, NC
Posts: 5,584
Likes: 0
Received 0 Likes on 0 Posts
Nice work on the doubler!
 
  #171  
Old 09-16-2011
mcramer15's Avatar
Member
Thread Starter
Join Date: Jun 2010
Location: Alma Center, WI
Posts: 8
Likes: 0
Received 0 Likes on 0 Posts
Originally Posted by seed60
Nice work on the doubler!
Well thank you!
 
  #172  
Old 09-17-2011
mcramer15's Avatar
Member
Thread Starter
Join Date: Jun 2010
Location: Alma Center, WI
Posts: 8
Likes: 0
Received 0 Likes on 0 Posts
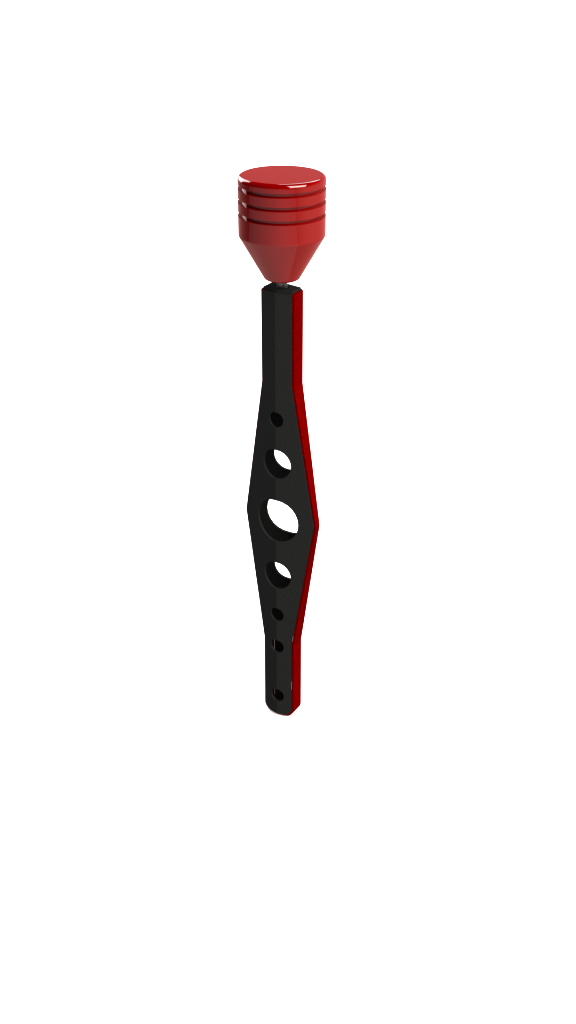
So I made a bracket for my cables but ran into a wall with the actual shifting. I could not get it to shift at all. Is it really that hard to shift or will adding oil significantly help shifting? Look at my set up and give me some advice, ideas, and/or tips. Right now its not complete so there is pieces kinda just welded on... Looks like a hack job right now.


Attached Thumbnails 93 ford ranger complete rebuild from bare frame with SAS-dsc03710.jpg   93 ford ranger complete rebuild from bare frame with SAS-dsc03711.jpg   93 ford ranger complete rebuild from bare frame with SAS-dsc03712.jpg   93 ford ranger complete rebuild from bare frame with SAS-dsc03713.jpg   93 ford ranger complete rebuild from bare frame with SAS-dsc03715.jpg  

93 ford ranger complete rebuild from bare frame with SAS-dsc03716.jpg   93 ford ranger complete rebuild from bare frame with SAS-dsc03718.jpg  
  #173  
Old 09-27-2011
hiusken's Avatar
Member
Join Date: Aug 2011
Location: Durham
Posts: 1
Likes: 0
Received 0 Likes on 0 Posts
Nic work bud
 
  #174  
Old 09-27-2011
03edge's Avatar
Member
iTrader: (1)
Join Date: Feb 2009
Location: OH
Posts: 1,038
Received 1 Like on 1 Post
that looks awesome, good professional work so far
 
  #175  
Old 09-28-2011
mcramer15's Avatar
Member
Thread Starter
Join Date: Jun 2010
Location: Alma Center, WI
Posts: 8
Likes: 0
Received 0 Likes on 0 Posts
Thank you.


Quick Reply: 93 ford ranger complete rebuild from bare frame with SAS


All times are GMT -6. The time now is 04:38 PM.